
Operator's Manual
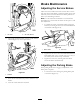
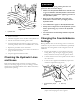
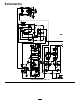
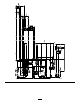

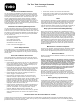

Figure58
1.Hydrauliclter
3.Removethelter.
4.Lubricatethegasketonthenewlterwithhydraulicoil.
5.Ensurethattheltermountingareaisclean.
6.Installthelterbyhanduntilthegasketcontactsthe
mountingsurface,thenrotateitanadditional1/2turn.
7.Repeattheprocedureontheotherlter.
8.Starttheengineandletitrunforabouttwominutesto
purgeairfromthesystem.
9.Stoptheengineandcheckforleaks.
CheckingtheHydraulicLines
andHoses
Daily,checkhydrauliclinesandhosesforleaks,kinked
lines,loosemountingsupports,wear,loosettings,weather
deterioration,andchemicaldeterioration.Makeallnecessary
repairsbeforeoperating.
WARNING
Hydraulicuidescapingunderpressurecan
penetrateskinandcauseinjury.
•Makesureallhydraulicuidhosesandlinesare
ingoodconditionandallhydraulicconnections
andttingsaretightbeforeapplyingpressureto
thehydraulicsystem.
•Keepyourbodyandhandsawayfrompin
holeleaksornozzlesthatejecthighpressure
hydraulicuid.
•Usecardboardorpapertondhydraulicleaks.
•Safelyrelieveallpressureinthehydraulicsystem
beforeperforminganyworkonthehydraulic
system.
•Getimmediatemedicalhelpifuidisinjected
intoskin.
ChangingtheCounterbalance
Settings
Duringdifferenttimesofthemowingseasonorwhenturf
conditionsvary,theamountofcounterbalance(upwardlift)
requiredonthecuttingdeckscanbechangedtomeetthe
conditions.
1.Positionthemachineonalevelsurface,lowerthe
cuttingdecks,stoptheengine,engagetheparking
brake,andremovethekeyfromtheignitionswitch.
2.Unlatchandremovetheaccesspanelfromthesideof
thecontrolarm.
3.Locatethetwocappedcounterbalancejumperwires
insidethecompartment(
Figure59).
Figure59
1.Counterbalancejumper
wires
2.Wirecap
4.WiththekeyintheOFFposition,removethecapfrom
jumperwiresandplugthewirestogether.
42