
Installation Instructions


FormNo.3363-231RevA
AirConditionerMountingKit
2009andAfterGroundsmaster4500-D/4700-DTractionUnit
ModelNo.30862
InstallationInstructions
Installation
1.Positionthemachineonalevelsurface.Setthe
parkingbrake,lowerthecuttingunits,turnthe
ignitionoffandremovethekey.
2.Removethebatterycover.
3.Disconnectthenegative(black)batterycablefrom
thebattery.
4.Removethenutandwashersecuringthepower
cabletothealternatorstud.Removethecablefrom
thealternator.
5.Disconnectthewireharnessfromthealternator.
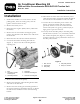
6.Loosenthealternatormountingboltandnut
(
Figure1).Also,loosenthetensioningbracket
adjustingbolt.
Figure1
1.Belt4.Alternator
2.Tensioningbracket
mountingbolt
5.Alternatormountingnut
3.Tensioningbracket6.Alternatormountingbolt
7.Removethebeltfromthepulleys.
8.Removethealternatorandtensioningbracketbolts
andremovethealternator.
9.Removetheboltsecuringthetensioningbracketto
theengineandremovethebracket(Figure1).Retain
theboltfortheinstallationofthenewtensioning
bracket.
10.Disconnecttheotherendofthealternatorpower
cablefromthebatteryandjunctionblock.Retainall
thefastenersfortheinstallationofthenewcable.
11.Connectthenewalternatorpowercabletothe
batteryandjunctionblockwiththefasteners
previouslyremoved.Coattheconnectionwith
Grafo112X(skin-over)grease,petroleumjellyor
lightgreasetopreventcorrosion.
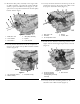
12.Looselymounttheidlerpulleytotheidlerpulley
bracketwitha3/8inchx1–1/4inchbolt,.406inch
atwasherandpulleynut(
Figure2).Thesquare
portionofthenutistobepositionedintheslotof
theidlerpulleybracket.
Figure2
1.Bolt,3/8inch
4.Idlerpulleybracket
2.Flatwasher
5.Pulleynut,3/8inch
3.Idlerpulley
©2010—TheToro®Company
8111LyndaleAvenueSouth
Bloomington,MN55420
Registeratwww.Toro.com.
OriginalInstructions(EN)
PrintedintheUSA.
AllRightsReserved