
Installation Instructions
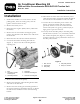


18.Looselymountthecompressortothecompressor
armwith(2)M10x110boltsandlocknuts
(Figure7).
Figure7
1.Compressor3.Locknut,M10(2)
2.M10x110bolt(2)
19.Tightenallthemountingboltsandnutsexceptthe
idlerpulleymountingnut.
•TorqueM8boltsto17–21ft-lb(23–29N-m)
•TorqueM10boltsto34–42ft-lb(47–57N-m)
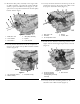
20.Connectthenewpowercabletothestudonthe
alternatorwiththeangenut(Figure8).
Figure8
1.Alternator
3.Compressor
2.Newpowercable
21.Connectthewireharnesstothealternator.
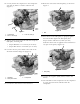
22.Routethenewbeltaroundthepulleys,asshownin
Figure9.
Figure9
1.Belt
23.Pressdownontheidlerpulleytoproperlytighten
thebeltandthentightentheidlerpulleybolt.
Propertensionwillallow3/8inch(10mm)
deectionwhen10lb.isappliedonthebeltbetween
anyspanofthepulleys(Figure10).
Figure10
1.Idlerpulley
24.Connectthenegative(black)batterycabletothe
battery.
25.Theinstallationofthecompressorcanbecompleted
byusingtheinstructionsincludedwiththe
compressor.
3