Form No. 3437-688 Rev A Flex-Force Power System™ 60V MAX Snowthrower Model No. 31853—Serial No. 400000000 and Up Model No. 31853T—Serial No. 400000000 and Up Register at www.Toro.com.
Safety For assistance, please see www.Toro.com/support for instructional videos or contact your Authorized Service Dealer before returning this product. READ ALL INSTRUCTIONS WARNING—When using an electrical machine, basic safety precautions should always be followed to reduce the risk of fire, electric shock, or injury, including the following: I. Training 1. The operator of the machine is responsible for any accidents or hazards occurring to others or their property. 2.
7. Do not use a damaged or modified battery pack or battery charger, which may exhibit unpredictable behavior that results in fire, explosion, or risk of injury. 8. If the supply cord to the battery charger is damaged, contact an Authorized Service Dealer to replace it. 9. Do not use non-rechargeable batteries. 10. Charge the battery pack with only the battery charger specified by Toro. A charger suitable for 1 type of battery pack may create a risk of fire when used with another battery pack. 11.
. When servicing the rotor, be aware that the rotor can still move even though the power source is off. 5. For best performance, use only genuine Toro replacement parts and accessories. Other replacement parts and accessories could be dangerous, and such use could void the product warranty. 6. Maintain the machine—Keep handles dry, clean, and free from oil and grease. Keep guards in place and in working order. Use identical replacement parts only. 7.
Safety and Instructional Decals Safety decals and instructions are easily visible to the operator and are located near any area of potential danger. Replace any decal that is damaged or missing. decal137-2257 137-2257 3. Thrown object hazard—keep bystanders away. 1. Warning—read the Operator’s Manual. 2.
decal137-9461 137-9461 1. Battery charge status decal137-9489 137-9489 1. Read the Operator’s Manual. 2. Recycle 4. Keep away from open flames. 5. Do not expose to rain. 3. Contains lithium ions; do not discard. decal115-5660 115-5660 1. Cutting/dismemberment hazards of hand or foot, impeller and auger—do not place your hand in the chute; remove the ignition key and read the instructions before servicing or performing maintenance. decal137-9490 137-9490 1. Read the Operator’s Manual. 2. Recycle 4.
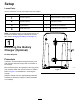
Setup Loose Parts Use the chart below to verify that all parts have been shipped. Procedure 1 2 3 4 Description Use Qty. No parts required – Mount the battery charger (optional). No parts required – Unfold the handle. Chute deflector 1 Install the chute deflector. Chute-control rod 1 Install the chute-control rod. Note: The battery pack is not fully charged when you purchase it. Before using the machine for the first time, refer to Charging the Battery Pack (page 13).
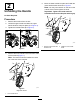
5. 2 Move the lower handle into place and install the lower handle knobs as shown in Figure 5. Note: You may use a wrench on the hex on the outside of the knob to tighten the knob. Unfolding the Handle Important: Tighten the knobs until the handlebar touches the side plate with no gap. No Parts Required Procedure 1. Remove the machine from the box. 2. Unfold the upper handle and allow the upper handle knobs to snap into place (A of Figure 3). 3. Tighten the handle knobs (B of Figure 3).
3 Installing the Chute Deflector Parts needed for this procedure: 1 Chute deflector Procedure g316999 Figure 6 9
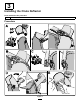
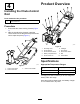
Product Overview 4 Installing the Chute-Control Rod Parts needed for this procedure: 1 Chute-control rod Procedure 1. Ensure that the chute is facing forward (Figure 7). 2. With the handle facing forward, install the chute-control rod into the guide and push it down until it snaps into place (Figure 7). g318456 Figure 8 1. Discharge chute 6. Headlight 2. Chute deflector 3. Chute-deflector handle 4. Battery-compartment lid 7. ECO switch 8. Electric-start button 9. Bail 5. Chute-control rod 10.
Starting the Machine Operation 1. Ensure that the battery pack is installed in the machine; refer to Installing the Battery Pack (page 11). Installing the Battery Pack 1. Make sure that the vents on the battery are clear of any dust and debris. 2. Insert the electric-start button into the electric starter (A of Figure 10). 2. Lift up the battery-compartment lid (A of Figure 9). 3. Squeeze the bail and hold it to the handle (B and C of Figure 10). 3.
Removing the Battery Pack from the Machine Activating ECO Mode Using ECO mode may extend battery life by reducing rotor speed; use ECO mode whenever you are moving snow a short distance. Activate ECO mode using the ECO switch as shown in Figure 8. g318457 Figure 11 1. Turn ECO mode on 2. Turn ECO mode off Shutting Off the Machine 1. Release the bail (A of Figure 12). 2. Remove the electric-start button from the electric starter (B of Figure 12). 3.
Charging the Battery Pack Important: The battery pack is not fully charged when you purchase it. Before using the tool for the first time, place the battery pack in the charger and charge it until the LED display indicates the battery pack is fully charged. Read all safety precautions. button on the battery pack to display the current charge (LED indicators). Ensure that the vents on the battery and charger are clear of any dust and debris. g290533 Figure 13 5. LED indicators (current charge) 2.
Adjusting the Discharge Chute and Chute Deflector Clearing a Clogged Discharge Chute To adjust the discharge chute, move the handle on the chute-control rod in the direction that you wish to direct the snow stream. WARNING Contacting a rotating rotor with your hands inside the discharge chute could cause serious personal injury. To adjust the chute deflector (and therefore the height of the snow stream), squeeze the trigger and raise or lower the chute deflector (Figure 14).
Operating Tips Preventing Freeze-up after Use WARNING • Let the motor run for a few minutes to prevent The rotor can throw stones, toys, and other foreign objects and cause serious personal injury to you or bystanders. moving parts from freezing. Shut off the machine, wait for all moving parts to stop, and remove ice and snow from the machine. • Clean off any snow and ice from the base of the • Keep the area to be cleared free of all objects that the rotor blades could pick up and throw. chute.
Maintenance Storage Stop the machine, remove the electric-start button, remove the battery pack from the machine, and wait for all movement to stop before adjusting, servicing, cleaning, or storing the machine. Important: Store the machine, battery pack, and charger only in temperatures that are within the appropriate range; refer to Specifications (page 10). Important: If you are storing the battery pack for the off-season, charge it until 2 or 3 LED indicators turn green on the battery.
Troubleshooting Perform only the steps described in these instructions. All further inspection, maintenance, and repair work must be performed by an authorized service center or a similarly qualified specialist if you cannot solve the problem yourself. Problem The machine does not run or does not run continuously. Possible Cause Corrective Action 1. The battery pack is low on charge. 1. Charge the battery pack. 2. The battery pack is not fully seated. 2.
Notes:
EEA/UK Privacy Notice Toro’s Use of Your Personal Information The Toro Company (“Toro”) respects your privacy. When you purchase our products, we may collect certain personal information about you, either directly from you or through your local Toro company or dealer.