
Use and Care Manual
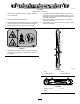


ProductOverview
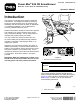
g018887
Figure11
1.Handgrip(2)
9.Dischargechute
2.Auger/impellerlever10.Scraper
3.Speed-selectorlever
11.Auger
4.QuickStick™
discharge-chutecontrol
12.Skid(2)
5.Tractionlever13.Electric-startbutton
6.Fuel-tankcap14.Electric-startplug-in
7.Oil-lltube/dipstick15.Snow-cleanouttool
8.Chutedeector
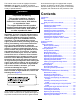
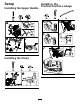
g016500
Figure12
1.Primer5.Throttle
2.Ignitionswitch
6.Oil-drainplug
3.Choke
7.Recoil-starthandle
4.Fuel-shutoffvalve
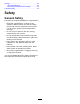
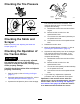
g004217
Figure13
1.Snow-cleanouttool(attachedtothehandle)
Operation
Note:Determinetheleftandrightsidesofthe
machinefromthenormaloperatingposition.
BeforeOperation
BeforeOperationSafety
•Forelectric-startmodelsonly:Useextension
cordsandreceptaclesasspeciedinthemanual.
Thoroughlyinspecttheelectricalcordbefore
pluggingitintoapowersource.Ifthecordis
damaged,donotuseit.Replacethedamaged
cord.Unplugthepowercordwheneveryouare
notstartingthemachine.
•Wearadequatewintergarmentswhenever
youoperatethemachine.Wearsubstantial,
slip-resistantfootwearthatimprovesfootingon
slipperysurfaces.Avoidloose-ttingclothingthat
cangetcaughtinmovingparts.
•Alwaysweareyeprotectionduringoperationor
whileperforminganadjustmentorrepairtoprotect
youreyesfromforeignobjectsthatthemachine
maythrow.
•Thoroughlyinspecttheareawhereyouwillusethe
machine,andremovealldoormats,sleds,boards,
wires,andotherforeignobjects.
•Ifashield,safetydevice,ordecalisdamaged,
illegible,ormissing,repairorreplaceitbefore
beginningoperation.Alsotightenanyloose
fasteners.
9