Form No. 3326-380 CCR Powerlite 325 Snowthrower Model No. 38173—220000001 and Up Model No.
This spark ignition system complies with Canadian ICES-002. Preparing the Fuel System . . . . . . . . . . . . . . . . . . Preparing the Engine . . . . . . . . . . . . . . . . . . . . . . Preparing the Snowthrower . . . . . . . . . . . . . . . . . Folding and Unfolding the Handle . . . . . . . . . . . . Troubleshooting . . . . . . . . . . . . . . . . . . . . . . . . . . . . . Ce système d’allumage par étincelle de véhicule est conforme à la norme NMB-002 du Canada.
This manual uses two other words to highlight information. Important calls attention to special mechanical information and Note: emphasizes general information worthy of special attention. – Use an approved fuel container. Safety – Replace the fuel tank cap securely and wipe up any spilled fuel. – Never add fuel to a running or hot engine. – Fill the fuel tank outdoors with extreme care. Never fill the fuel tank indoors.
• If a shield, safety device, or decal is damaged, illegible, or lost, repair or replace it before beginning operation. Also, tighten any loose fasteners. • Never operate the snowthrower near glass enclosures, automobiles, window wells, and drop-offs without properly adjusting the snow discharge angle. Keep children and pets away. • Do not smoke while handling gasoline. • Do not overload the machine capacity by attempting to clear snow at too fast a rate. • Do not use the snowthrower on a roof.
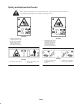
Safety and Instruction Decals Safety decals and instructions are easily visible to the operator and are located near any area of potential danger. Replace any decal that is damaged or lost. 94-2560 94-2562 1. Cutting/dismemberment in impeller hazard—stay away from moving parts, stop the engine, and remove the key before performing maintenance 1. Cutting/dismemberment in auger hazard—stay away from moving parts, stop the engine, and remove the key before performing maintenance 94-2577 94-2561 1.
104-4947 (Recoil-start model only) 1. Thrown object hazard—keep bystanders away 2. Cutting/dismemberment in impeller and auger hazard—stay away from moving parts, stop the engine, and remove the key before performing maintenance 3. 4. 5. 6. Choke Ignition off Ignition on Primer 7. Starter 8. Warning—read the Operator’s Manual 9. Warning—stop the engine before leaving the machine 104-4949 (Electric-start model only) 1. Thrown object hazard—keep bystanders away 2.
104-9740 Assembly Note: Determine the left and right sides of the machine from the normal operating position. Loose Parts Description Qty.
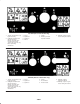
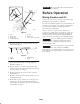
Installing the Handle 3 1. Position the ends of the upper handle section on the inside of the lower handle section and align the holes (Fig. 2). 4 5 1 2 5 m-3371 4 1 Figure 3 1. Discharge chute 2. Hex bolt (3) 3. Chute handle 4 4. Washer (3) 5. Locknut (3) 3 2 2. Secure the discharge chute onto the hex bolts with two washers and two locknuts (Fig. 3). m–4022 Figure 2 1. Handle knob (2) 2. Lower handle section 3. Oval-head bolt (2) 3.
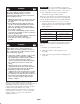
Important The control cable must contain slack when you disengage the control bar. 5 4 6 Before Operation Mixing Gasoline and Oil 7 Your Toro snowthrower is powered by a two-cycle engine that requires a 50:1 gasoline-to-oil mixture. 3 2 1 Use only clean, unleaded gasoline no more than 30 days old and with an octane rating of 87 or higher. Using unleaded gasoline reduces combustion chamber deposits and promotes longer spark plug life. m-3993 Engines certified to comply with U.S.
Important Do not use fuel additives except a fuel stabilizer during storage. Do not use fuel stabilizers with an alcohol base, such as ethanol, methanol, or isopropanol. Danger In certain conditions, gasoline is extremely flammable and highly explosive. A fire or explosion from gasoline can burn you and others and can damage property. 1. Pour a half gallon (1.9 liters) of fresh, unleaded gasoline into an approved fuel container. Note: Do not mix gasoline and oil in the fuel tank.
Filling the Fuel Tank 3 2 4 5 Important Do not overfill the fuel tank. The gasoline-and-oil mixture must have room to expand. 1. Clean around the fuel tank cap (Fig. 6); do not allow snow or water to enter the fuel tank. 1 6 1 919 Figure 7 1. 2. 3. 4. m-3993 Choke lever Key switch Primer Recoil starter 5. Electric-start button (electric-start model only) 6. Power cord connection (electric-start model only) Figure 6 1. Fuel tank cap Starting the Engine 1. Turn the key to the On position. 2.
Note: Run the electric starter no more than ten times at intervals of five seconds on, then five seconds off. • Remove the snow as soon as possible after it falls. This produces the best snow removal results. Important Running the electric starter extensively can overheat and damage the starter. • The snowthrower clears down to the ground and propels itself forward when you raise the handle. The snowthrower tilts slightly forward so that the rotor blades strike the ground.
Maintenance Note: Determine the left and right sides of the machine from the normal operating position. Recommended Maintenance Schedule Maintenance Service Interval Maintenance Procedure Initially • Check the control cable both initially and after the first hour of operation; adjust it if necessary. Refer to Adjusting the Control Cable on page 13. • Check for loose fasteners and tighten them if necessary. Annually • Check the control cable and adjust it if necessary.
Replacing the Rotor Blades Note: After extensive use, the drive belt may wear and lose its proper belt tension. Improper belt tension causes belt slippage and decreases the performance under a heavy load. Belt slippage may occur after two or three seasons of normal usage (10 to 15 hours). If the drive belt slips (continuously squeals) under a heavy load, increase the belt tension by moving the Z-fitting to the next hole to the right on the cable adjuster (Fig. 5).
1 2 1. Stop the engine and wait for all moving parts to stop. 5 2. Remove the key from the switch. 6 4 3. Disconnect the wire from the spark plug. Refer to steps 3 through 5 of Replacing the Spark Plug on page 16. 4. Remove two short self-tapping screws, one long self-tapping screw, one bolt, one washer, and one nut that secure the left side cover to the snowthrower frame (Fig. 12). 3 7 929 8 Figure 11 1. Torx screw (4 per rotor blade) 2. Bolt (2 per rotor blade) 3. Locknut (6 per rotor blade) 4.
Replacing the Spark Plug Use a Champion CJ8Y or equivalent spark plug. Install a new spark plug after every 100 operating hours. 1 2 3 1. Stop the engine and wait for all moving parts to stop. 2. Remove the key from the switch. 4 3. Remove the two screws that secure the control panel to the housing (Fig. 15). 5 6 m–4014 Figure 14 1. Drive belt 2. Brake arm 3. Idler pulley 4. Drive pulley 5. Idler pivot nut 6. Rotor pulley 2 1 917 Figure 15 8.
Preparing the Fuel System 1. Add a fuel stabilizer/conditioner to the fuel in the fuel tank as directed. 1 Note: If you use Toro 50:1 2-Cycle Oil (Fuel Stabilizer Added), you do not need to add a fuel stabilizer/conditioner. m 3215 Figure 17 2. Run the engine for five minutes to distribute the conditioned fuel through the fuel system. 2. 0.030 in. (0.76 mm) 3. Stop the engine and allow it to cool. 9. Install the spark plug by hand and then torque it to 15 ft-lb (20.4 N.m).
Preparing the Snowthrower Note: After you unfold the handle and the discharge chute, tighten all the knobs and the locknut securely. 1. Tighten all loose screws, bolts, and locknuts. Repair or replace any damaged parts. 2. Clean the snowthrower thoroughly. 3. Cover the snowthrower and store it in a clean, dry place out of the reach of children. Allow the engine to cool before storing it in any enclosure.
Troubleshooting Problem Electric starter does not turn (electric-start models only) Engine does not start or starts hard Engine runs rough Engine runs, but the snowthrower discharges snow poorly or not at all Possible Causes Corrective Action 1. The power cord is disconnected at the outlet or the snowthrower. 1. Connect the power cord to the outlet and/or the snowthrower. 2. The power cord is worn, corroded, or damaged. 2. Replace the power cord. 3. The power outlet is not energized. 3.
Problem Snowthrower does not properly clear snow off the surface Snowthrower does not self-propel Rotor blades do not stop properly Possible Causes Corrective Action 2. You are trying to remove too much snow per swath. 2. Reduce the amount of snow removed per swath. 3. You are trying to remove extremely heavy or wet snow. 3. Don’t overload the snowthrower with extremely heavy or wet snow; reduce the amount of snow removed per swath. 4. The discharge chute is plugged. 4.