
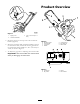
Operator's Manual


1. Installing the Handle
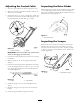
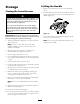
1. P osition the ends of the upper handle on the inside of
the lo w er handle and align the holes .
2. Inser t the o v al-head bolts into the aligned holes , with
the bolt heads on the outside of the handle . ( Figure 3 ).
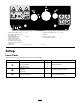
Figure 3
3. Install the cur v ed w ashers and the handle knobs on the
o v al-head bolts and tighten the knobs secur el y .
2. Installing the Discharge
Chute
1. P osition the holes in the sides of the disc harg e c hute
o v er the bolts ends on the sides of the c hute handle .
( Figure 4 ).
Figure 4
1. Discharge chute 3. Washer and locknut
2. Bolt ends
2. Secure the sides of the disc harg e c hute with 2 w ashers
and 2 loc kn uts .
3. R otate the disc harg e c hute to the upright position.
4. Install the w asher and loc kn ut tightl y onto the bolt end
at the rear of the disc harg e c hute .
3. Installing the Control Cable
Important: Ensur e that the contr ol ca ble is in the
g r oo v e of the ca ble pulley located on the lo w er left side
of the sno wthr o w er ( Figur e 5 ).
Figure 5
1. Cable pulley
1. R oute the control cable through the loop on the left
side of the sno wthro w er housing .
2. Hook the spring into the round hole at the end of the
cable adjuster ( Figure 6 ).
Figure 6
1. Spring
2. Cable adjuster
3. Secure the end of the cable to the cable adjuster .
4. Slide the spring co v er o v er the spring and the cable
adjuster and push the spring end through the hole at the
end of the spring co v er ( Figure 7 ).
5