
Service Manual


ENGINE REMOVAL AND INSTALLATION
4 - 4 Single Stage Snowthrower Service Manual
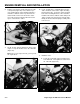
8. Pull the recoil starter rope through the hole in the
control panel (Figure 42). Next, slide the rope
onto and through the starter handle and make a
small knot. Slide the starter rope back into the
starter handle. Remove the knot in the starter
rope at the starter housing and allow the starter
rope to retract into the starter.
Figure 42 0217-025
9. On 20” models, slide the muffler into place on the
engine. Torque the muffler nuts to 90 - 120 in·lbs.
(Figure 43).
Note: Do not over torque the nuts, you may crack
the engine block.
Figure 43 0217-026
10. If your snowthrower is equipped with an electric
starter, install the starter to the engine mounting
bracket (Figure 44). Torque the starter mounting
bolts at the mounting bracket to 120 - 180 in·lbs.
Install the wire harness with the cable clamp to the
engine. Replace the starter motor tie down strap.
Finally, mount the switch and plug assembly to the
lower shroud.
Figure 44 0217-027
11. Belt Drive Units:
A. Torque the crankshaft engine mounting nut to
170 - 220 in·lbs. Then tighten the starter nut to
70 - 120 in·lbs (Figure 45).
Figure 45 0217-028