
Service Manual


Single Stage Snowthrower Service Manual 7 - 5
MAINTENANCE
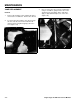
Installing The New Blade
The rotor blades are made of laminated rubber.
Examine the edge of a blade to see the differences in
the thickness of the layers. (Some blades have a part
number on the thick side of the blade.)
Both blades MUST be installed with the thicker layer
facing down. If this is not done, the blades will be
unbalanced, causing the snowthrower to hop or
bounce.
Press the spacer bushings into the holes in the new
blade.
Insert the new blade between the steel plates and
secure it with the original bolts and nuts. Position the
bolt heads on the thick (bottom) side of the blade
(Figure 172). We suggest starting with the center bolts
and move outward towards the ends. After all bolts are
installed, tighten all bolts.
Figure 172 0623-02
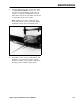
1992 And Newer Style
Beginning in 1992 the method of attaching the blades
changed slightly and a wear indicator hole also
became standard (Figure 173).
Figure 173 1854-16
When the paddle wears to this indicator, we
recommend replacing the blades.
The rotor blades are supported on both ends and in the
center only. Note: Completely remove and replace
one blade before starting on the other.
Many models require a Torx driver or ratchet to remove
some of the screws holding the paddles to the rotor.
These are typically used on the outer ends where snow
would build up on a conventional hex head bolt.
(A) Bolt
(B) Washer
(C) Bushing
(D) Locknut
(E) Thick Side
(F) Thin Side
A
B
C
D
E
F
(A) Wear Indicator
A