Form No. 3414-279 Rev C Flex-Force Power System™ 60V MAX Snowthrower Model No. 39901—Serial No. 319000001 and Up Model No. 39901T—Serial No. 319000001 and Up Model No. 39902—Serial No. 319000001 and Up Register at www.Toro.com.
Introduction For assistance, please see www.Toro.com/support for instructional videos or contact 1-888-384-9939 before returning this product. This machine is intended to be used by residential homeowners. It is designed for removing up to 30 cm (12 inches) of snow from patios, sidewalks, and small driveways. It is not designed for removing materials other than snow, nor is it designed for clearing off gravel surfaces.
Safety 7. Do not use a damaged or modified battery pack or battery charger, which may exhibit unpredictable behavior that results in fire, explosion, or risk of injury. 8. If the supply cord to the battery charger is damaged, contact an Authorized Service Dealer to replace it. 9. Do not use non-rechargeable batteries.
8. Do not force the machine—Allow the machine to do the job better and safer at the rate for which it was designed. 4. When servicing the rotor, be aware that the rotor can still move even though the power source is off. 9. Stay alert—Watch what you are doing and use common sense when operating the machine. Do not use the machine while ill, tired, or under the influence of alcohol or drugs. 5. 10. Operate the machine only in good visibility and appropriate weather conditions.
Safety and Instructional Decals Safety decals and instructions are easily visible to the operator and are located near any area of potential danger. Replace any decal that is damaged or missing. decal137-2257 137-2257 3. Thrown object hazard—keep bystanders away. 1. Warning—read the Operator’s Manual. 2.
decal137-9461 137-9461 1. Battery charge status decal137-9456 137-9456 Model 88675 1. Read the Operator’s Manual. 2. Keep away from open fire or flames. 3. Do not expose to rain. decal138-6697 138-6697 decal137-9455 137-9455 Model 88660 1. Read the Operator’s Manual. 2. Keep away from open fire or flames. 3. Do not expose to rain.
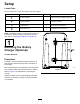
Setup Loose Parts Use the chart below to verify that all parts have been shipped. Procedure 1 2 3 4 Description Use Qty. No parts required – Mount the battery charger (optional). No parts required – Unfold the handle. Chute deflector 1 Install the chute deflector. Chute-control rod 1 Install the chute-control rod. Note: The battery pack is not fully charged when you purchase it. Before using the machine for the first time, refer to Charging the Battery Pack (page 12).
2 Unfolding the Handle No Parts Required Procedure 1. Remove the machine from the box. 2. Unfold the upper handle and allow the upper handle knobs to snap into place (A of Figure 3). 3. Tighten the handle knobs (B of Figure 3). g290970 Figure 4 Right side shown 1. Lower handle knob 5. g282574 Move the lower handle into place and install the lower handle knobs as shown in Figure 5. Figure 3 4. Remove the lower handle knobs from both sides of the machine (Figure 4).
3 4 Installing the Chute Deflector Installing the Chute-Control Rod Parts needed for this procedure: Parts needed for this procedure: 1 1 Chute deflector Procedure Chute-control rod Procedure Install the chute deflector over the posts on the discharge chute as shown in Figure 6. 1. Ensure that the chute is facing forward (Figure 7). Note: Install one side of the chute deflector and then 2.
Operation Product Overview Installing the Battery Pack 1. Make sure that the vents on the battery are clear of any dust and debris. 2. Lift up the battery-compartment lid (A of Figure 9). 3. Line up the cavity in the battery pack with the tongue on the machine and slide the battery pack into the compartment until it lock into place (B of Figure 9). 4. Close the battery-compartment lid (C of Figure 9). g282216 Figure 8 1. Discharge chute 6. Headlight 2. Chute deflector 3.
Starting the Machine 1. Ensure that the battery pack is installed in the machine; refer to Installing the Battery Pack (page 10). 2. Insert the electric-start button into the electric starter (A of Figure 10). 3. Squeeze the bail and hold it to the handle (B and C of Figure 10). Note: When you squeeze the bail, the lights turn on and the battery-charge indicator lights on the battery illuminate. 4. Press the electric-start button until the motor starts (D of Figure 10). g289737 Figure 11 1.
Charging the Battery Pack Important: The battery pack is not fully charged when you purchase it. Before using the machine for the first time, place the battery pack in the charger and charge it until the LED display indicates the battery pack is fully charged. Read all safety precautions. Important: Charge the battery pack only in temperatures that are within the appropriate range; refer to Specifications (page 10).
Adjusting the Discharge Chute and Chute Deflector Clearing a Clogged Discharge Chute To adjust the discharge chute, move the handle on the chute-control rod in the direction that you wish to direct the snow stream. WARNING Contacting a rotating rotor with your hands inside the discharge chute could cause serious personal injury. To adjust the chute deflector (and therefore the height of the snow stream), squeeze the trigger and raise or lower the chute deflector (Figure 15).
Operating Tips WARNING The rotor can throw stones, toys, and other foreign objects and cause serious personal injury to you or bystanders. • Keep the area to be cleared free of all objects that the rotor blades could pick up and throw. • Keep all children and pets away from the area of operation. • Remove the snow as soon as possible after it falls. • Push the machine forward, but allow it to work at its own pace. • Overlap each swath to ensure complete snow removal.
Maintenance Storage Stop the machine, remove the electric-start button, remove the battery pack from the machine, and wait for all movement to stop before adjusting, servicing, cleaning, or storing the machine. Important: Store the machine, battery pack, and charger only in temperatures that are within the appropriate range; refer to Specifications (page 10).
Troubleshooting Perform only the steps described in these instructions. All further inspection, maintenance, and repair work must be performed by an authorized service center or a similarly qualified specialist if you cannot solve the problem yourself. Problem The machine does not start. Possible Cause Corrective Action 1. The battery is not fully installed in the machine. 1. Remove and then reseat the battery into the machine, making sure that it is fully installed and latched. 2.
Notes:
Notes:
California Proposition 65 Warning Information What is this warning? You may see a product for sale that has a warning label like the following: WARNING: Cancer and Reproductive Harm—www.p65Warnings.ca.gov. What is Prop 65? Prop 65 applies to any company operating in California, selling products in California, or manufacturing products that may be sold in or brought into California.