
Installation Instructions


2
Description UseQty.
Long hose with fitting, 1/2 inch dia
Spray gun
Plastic hose clamp, small
1
1
1
Connect the spray hose
Note: If you are installing this kit on a sprayer with a covered boom kit, you will need additional parts and instructions;
contact your Authorized Toro Distributor for more information.
Preparing the Machine
1. Ensure that the machine is empty of all fluids. If
chemicals have been used in the machine, flush the
system thoroughly with clean water; refer to your
vehicle Operator’s Manual for instructions.
2. Disconnect the negative battery terminal from the
battery.
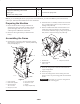
Assembling the Frame
1. Install the hose reel frame to the boom frame supports
using 4 flange-head bolts (1/2 x 1-1/4 inch) and 4 flange
nuts (1/2 inch) (Fig. 1).
m–7370
1
2
3
4
5
6
7
8
Figure 1
1. Hose reel frame
2. Boom frame supports
3. Flange-head bolt,
1/2 x 1-1/4 inch
4. Flange nut, 1/2 inch
5. Hose reel assembly
6. Bolt, 5/16 x 1 inch
7. Washer
8. Flange nut (5/16 inch)
2. Install the hose reel assembly onto the hose reel frame
(Fig. 1) using 4 bolts (5/16 x 1 inch), 4 washers, and
4 flange nuts (5/16 inch).
3. Remove and discard the bolt and nut from the lower
inside roller support on the hose reel and install the
electrical box in that hole (Fig. 2), using a flange-head
bolt (5/16 x 1 inch) and a flange nut (5/16 inch).
1
3
2
m–7379
Figure 2
1. Electrical box
2. Flange-head bolt,
5/16 x 1 inch
3. Flange nut, 5/16 inch
4. Route the wiring harness under the tank and into the
engine compartment.
5. Raise the sprayer.
6. Secure the wiring harness to the existing wires and
hoses to remove any slack using plastic ties included in
the kit.
Important Ensure that you secure the wiring harness
away from any hot or moving parts.