
Operator's Manual


8
MAINTENANCE
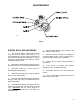
MOTOR REPLACEMENT:
1. Disconnect the Battery wire from the
positive (+) and negative (-) post of the vehicle
battery.
2. Cut the ground wire just below the butt
splice connector, approximately 14" from the
motor.
3. Remove the (4) #10 x 1/2" screws, washers,
and nuts that secure the cover plate on the electric
box assembly.
4. Disconnect the positive (+) wire of the reel
motor from the terminal on the circuit breaker
located on the cover plate assembly. Pull the wire
out through the opening found in the bottom of
the electric box.
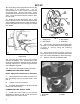
5. Remove the (4) 5/16" x 1" hex hd cap screws,
washers and nuts securing motor mounting
bracket and motor to hose reel. Remove bracket
and motor.
6. Remove the (4) 5/16" x 3/4" hex head cap
screws and flat washers securing the motor
mounting bracket to motor. Remove motor.
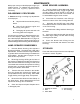
7. Loosen the set screw on the motor pinion and
remove pinion and key from motor shaft.
8. Install pinion and key earlier removed on new
motor shaft and secure by tightening the set
screw securely.
9. Attach motor mounting bracket to motor
using the (4) 5/16" x 3/4" hex head cap screws
and flat washers. Tighten fasteners securely.
10.Loosely mount the motor mounting bracket
and motor to the hose reel using the fasteners
earlier removed.
11.Move motor mounting bracket and motor
until pinion has engaged disc gear. Tighten
fasteners securely.
12.Feed the positive (+) wire from the reel motor
through the wire bushing in the bottom of the
electric box and crimp a #10 ring terminal to the
end of the wire.
13.Connect the positive (+) wire from the reel
motor to the terminal on the circuit breaker
located on the cover plate assembly.
14.Reinstall the cover plate assembly to the
electrical box using the fasteners previously
removed. Tighten fasteners securely.
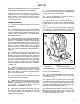
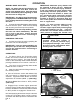
1. Unwind hose to be replaced and remove
from Hose Reel. Hold riser outlet while removing
hose connector.
2. Apply Teflon thread tape and hand thread the
male hose connector into the outlet tube of the
Inlet Assembly.
3. Using a wrench, firmly hold the outlet tube
while tightening the hose connector.
4. Remove Hand Sprayer from damaged hose.
Insert hosebarb into new hose and attach hose
Clamp securely.
5. Open the Hose Reel Valve handle and pull
trigger on Hand Sprayer to purge the hose of
gases. When fluid appears, close the Hose Reel
Valve handle.
IMPORTANT! Fully extend and charge
the Spray Hose before winding it onto the
Spool. This prevents the flattening of the
hose resulting in excessive pressure on the
spool when spraying is resumed and fluid
supply is discharged under high pressure.
Spray Hose Replacement:
CAUTION
TO AVOID EXPOSURE TO SPRAY
SOLUTION WHICH MAY CONTAIN
HARMFUL CHEMICALS, DISENGAGE
THE SPRAY PUMP (USING THE PUMP
SWITCH) TO REMOVE PRESSURE
BEFORE PERFORMING THE
FOLLOWING PROCEDURE.
15.Reconnect the motor negative (-) wire to the
negative wire from battery with butt splice
connector.
16.Reinstall the battery wire on the positive (+)
and negative (-) post of the vehicle battery.