
Installation Instructions
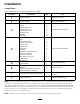


Installation
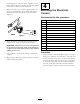
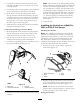
LooseParts
Usethechartbelowtoverifythatallpartshavebeenshipped.
ProcedureDescription
Qty.
Use
1
Nopartsrequired
–
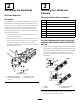
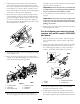
Preparethemachine.
2
Nopartsrequired
–
RemovetheHardstops
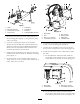
Ultrasonicsensor2
U-bolts8
Washers(5/16inch)
8
Locknuts(1/4inch)
8
Rubbersensorcover2
Protectiontube2
Wireclips4
3
Cableties
10
Installtheultrasonicsensors.
Mountplate1
Relay6
Bolt(1/4x5/8inch)
4
Lockwasher(1/4inch)
8
Nut(1/4inch)
8
Wireharness1
Screw(#10)
2
Nut(#10)
2
ElectronicControlUnit(ECU)
1
Bolt(1/4x2-1/2inch)
4
Bolt(5/16x3/4inch)
2
Lockwasher(5/16inch)
2
U-boltclamps2
4
Nut(5/16inch)
4
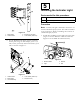
Mounttheelectroniccontrols.
Decal,94-85821
5
Lightassembly1
Installtheindicatorlight.
Rockerswitch1
Cableties
6
Indicatorlight(Workman200only)
1
6
Grommet(Workman200only)
1
Installthecontrols
7
Conversionwires(Olderboomliftsonly)
2
Connectthewiringtothesensorsand
actuators.
8
Nopartsrequired
–
Calibratethesonicbooms.
Note:TheSonicBoomKitrequireselectricboomliftactuatorstoautomaticallyraiseandlowerthebooms.Most
machineshavehadelectricboomactuatorsinstalledorarebeinginstalledinconcertwiththisSonicBoomKit.
Thesetupproceduresthatfollowweredevelopedforthesesituations.Ifyoudonothaveelectronicboomlift
actuatorsinstalledoravailabletobeinstalled,contactyourAuthorizedToroDealertoobtainthecorrectpartsto
modifyyoursprayertobecompatiblewiththeSonicBoomKit.Thenecessarypartsare:ElectronicBoomLift
Actuators(2),Fuses(2),andSwitches(2).
Note:Determinetheleftandrightsidesofthemachinefromthenormaloperatingposition.
2