
Installation Instructions
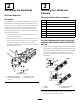
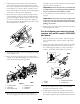
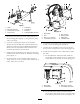
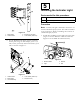

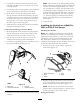

Figure13
1.Decal94-85823.Washer
2.Light4.Nut
2.Removethenutandwasherfromthebottomofthe
light.
3.Installthelightinthedashandsecureitusingthe
washerandnut(Figure12orFigure13).
4.Connectthe2spadeconnectorsonaseparatebranch
ofthewiringharnesstothepostsonthelight.
6
InstallingtheControls
Partsneededforthisprocedure:
1Rockerswitch
6
Cableties
1
Indicatorlight(Workman200only)
1
Grommet(Workman200only)
InstallingtheControlsonaMultiPro
1200or1250TurfSprayer
InstallingtheSwitches
Note:Thefollowingprocedureassumesboomlift
switchesareinstalledonthemachine.Formachines
withoutboomliftswitchesorifyouhavenotalready
installedtheswitchesfromtheElectricBoomLift
Kit,installthoseswitchesnowasdescribedinthe
instructionswiththatkit.Donotinstallthewireharness
thancomeswiththeElectricBoomLiftKit.
1.Removethespraycontrolpaneltoexposethe
bottomside(Figure14forthe1250andFigure15
forthe1200).
Figure14
1.Plug
3.Notch(atback)
2.Switch4.Spraycontrolpanel
Figure15
1.Sonicboomswitch
location
2.Spraycontrolpanel
2.Removethepluginthesonicboomslotfromthe
spraycontrolpanelonthevehicleandinstallthe
rockerswitchprovidedinitsplace(Figure14forthe
1250andFigure15forthe1200).
Note:Ensurethattheorientationoftheswitch
matcheswhatisshowninFigure14,withthenotch
pointingtowardtherearofthevehicle.
WiringtheSwitches
1.Routethebranchofthesonicboomwireharness
withthethreelargeconnectorsintothecontrol
panelarea.
2.Ifboomliftswitchesareinstalledremoveany
existingconnectorspluggedintotheliftswitches.
3.Connecttheconnectorwithgreenandwhite,green
andblack,andblackwirestothebottomoftheright
boomliftswitch.
9