
Installation Instructions


Step
7
Connecting the Wiring to
the Sensors and Actuators
Parts needed for this step:
2
Conversion wires (Older boom lifts only)
Procedure
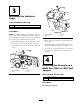
1. Ensure that the wire har ness is routed to the
bac k of the v ehicle along the path of the other
wires and hoses .
2. Use cable ties to secure the wiring har ness
to the other wiring har nesses a w a y from the
engine and mo ving par ts .
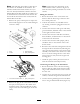
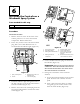
3. R emo v e the caps on the left and right actuator
connectors of the sonic boom har ness . R etain
the caps for later use .
4. R unning the T end of the wiring har ness along
the center boom frame , connect the wires as
follo ws:
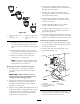
Note: Older actuators ma y ha v e a square
connector plug that is different from the
labeled actuator connector on the sonic boom
wire har ness . In this case , use the con v ersion
cables pro vide in loose par ts to mak e the
connection as instr ucted.
A. Connect the connector with the red/white
and blac k/white wires to the connector on
the right boom lift actuator .
B . Connect the connector with the red and
blac k wires to the connector on the left
boom lift actuator .
C . Connect the connector with the white ,
blac k/blue , and blac k wires to the right
sensor wire .
D . Connect the connector with the white ,
blac k/orang e , and blac k wires to the left
sensor wire .
5. Use the caps remo v ed previously to co v er and
protect the left and right actuator connectors
on the mac hine har ness .
6. Secure the wiring har ness to the boom frame
using cable ties as needed.
Step
8
Calibrating the Sonic Booms
No Parts Required
Procedure
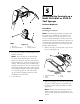
1. P ark the spra yer in an open, lev el turf area that
is free of trees , buildings , v ehicles , debris , and
underg round utilities and plumbing .
2. Set the Sonic Boom switc h to the man ual
position.
3. Use the left and right boom switc hes to mo v e
the booms so that they are parallel with the
g round.
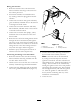
4. Set the Sonic Boom switc h to the Off position.
5.
A. Press and hold the left boom switc h in the
Lo w er position and the right boom switc h
in the Raise position.
B . W hile holding the switc hes , set the Sonic
Boom switc h to the A utomatic position.
Note: T he Sonic Boom light flashes rapidly ,
indicating calibration mode .
6. R elease the boom switc h.
7. Use the boom switc hes to adjust the booms
if necessar y so that they are parallel to the
g round.
Y ou will ha v e 20 seconds to adjust the booms .
At the end of 20 seconds the light stops
flashing and the Sonic Boom calibration is
complete .
13