
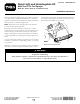
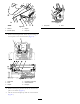
Installation Instructions

InstallingtheRearLights
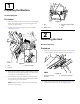
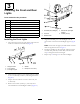
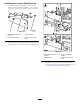
1.Aligntheholesoftherear-lightbracketwiththe2
holesinthecenter-boomchannel.
Note:Theleftandrightrear-lightbracketareunique.
Ensurethattheshortangeofthebracketisushwith
thesurfaceofthechannel.
Figure10
Leftbracketinstallationshown;rightbracketinstallation
issimilar
1.Flanged-headbolt(5/16x
3/4inch)
3.Locknut(5/16inch)
2.Rear-lightbracket(left
bracketshown)
4.Boom-framechannel
2.Securethebrackettotheframewiththe2anged-head
bolts(5/16x3/4inch)and2locknuts(5/16inch)as
showninFigure10.
3.Repeatsteps1and2fortheotherrear-lightbracketat
theotherendofthecenter-boomchannel.
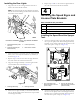
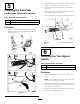
4.Aligntherear-lightassemblytotherear-lightbracket
withtheamber-lensoutboard(Figure11).
Figure11
1.Rear-lightassembly2.Rear-lightbracket
5.Securetherear-lightassemblytothebracketwiththe2
nuts(5/16-18)andthe2lockwashersthatareprovided
withthelightassembly.
6.Repeatsteps4and5attheotherrear-lightbracketat
theotherendofthecenter-boomchannel.
4
InstallingtheSpeedSignsand
LicensePlateBrackets
Partsneededforthisprocedure:
3Decal
1
Speedsign
2
Flange-headbolts(5/16x3/4inch)
2
Flangelocknuts(5/16inch)
InstallingtheSpeedDecaltheSprayer
Tank
1.Attheleftandrightsidesofthetank,measurefrom
thetopofthesprayertankdownwardapproximately
120mm(4-3/4inches)andmarkthatlocationonthe
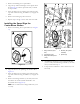
tankwithapieceoftape(AofFigure12).
Figure12
1.Topofthetanktothe
edgeofthetape—120mm
(4-3/4inches)
2.Frontofthetanktothe
edgeofthetape—469mm
(18-7/16inches)
2.Attheleftandrightsidesofthetank,measurefrom
thefrontofthesprayertankrearwardapproximately
469mm(18-7/16inches)andmarkthatlocationon
thetankwithapieceoftape(AofFigure12).
7