
Installation Instructions

3
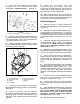
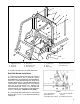
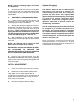
FIG. 4
1. Swell Latch 5. Lower Rear Mounting Bolt
2. Seat Belt Ass'y 6. R.H. Seat Box Support
3. Center Console 7. R.H. Inside Seat Belt Support
4. Center Console Rear R.H.Mount Bolt 8. Rear Panel Ass'y
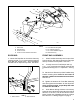
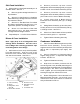
ROPS BAR:
1. Mount the Rops Bar to the vehicle frame by
inserting (8) 5/8" x 1-1/4" capscrews through the
Rops Bar and vehicle frame. Add lockwashers
and start nut on capscrews by hand. See FIG 5.
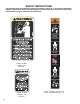
FIG. 5
1. Vehicle Frame 2. Rear ROPS bar
FRONT BAR ASSEMBLY:
1. Slide Front Bar Assembly onto bumper from
front of vehicle. Slip channel around front bumper
and top channel onto Rops Bar. See FIG. 7.
2. Loosely secure to Front Bumper with (4)
1/2" x 1-1/4" capscrews and flange locknuts and
to Rear Bar with (2) 3/8" x 1" capscrews. See Fig.
7.
3. Set the Cross Tube on top of the Front Bar Ass'y
behind mounting holes. Note: Do not secure at
this time. It will be slid forward and secured later.
See FIG. 12.
4. Tighten all hardware for Front Bar Assembly
and then tighten the hardware for the Rops Bar.
Using a torque wrench, torque Rops Bar nuts
to 150 ft-lb or 203.4 N-m.
5. Hook Blower Wiring Harness to Accessory
Solenoid and route following the path of the vehicle
harness, to the R.H. side of the vehicle Frame.
Route out the rear of Seat Box and to top of Rops
Bar. See FIG. 1 & Wiring Diagram on page 4.
1026
1
2
1027
1
2
3
4
7
6
5
8