
Installation Instructions

7
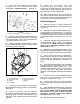
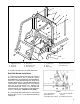
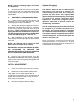
FIG. 10
1. Refrigeration Hose 4. Refrigeration Hose
#95-2199 #95-2200
2. Enclosure Cover 5. Condenser Ass'y
3. Blower Wire Harness 6. Refrigeration Hose
#95-2197
6. Connect Refrigeration Hose #95-2200 at rear
of Enclosure Cover at blue service port. See FIG.
10.
7. Connect Refrigeration Hose #95-2197 to
Condenser Assembly.
8. Connect Blower Wire Harness to Condenser
Ass'y. Insert Wire Harness through hole in rear of
Enclosure Cover and connect to Blower Ass'y. See
FIG. 9 and FIG. 10.
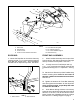
Gas Springs Installation:
1. Mount L.H. and R.H. Door Backing Angle
Assemblies with foam side out onto Enclosure
Cover Assembly using (6) 3/8" flange screws and
flange locknuts. See FIG. 12.
2. Mount Gas Spring Support Bracket to each
side of Enclosure Cover Assembly using (2) two
5/16 flange locking bolts. See FIG. 12.
Windshield Installation:
1. Loosely mount Lower Windshield Mount
Assembly to Front Bar Ass'y using (3) 1/4" x 3/4"
flange screws. See FIG. 12.
2. Fasten Windshield to Front Bar Ass'y using
(2) Windshield Clamps and the Lower Windshield
Mount. Secure with (8) 1/4" x 3/4" flange screws
and (2) flange locknuts. See FIG. 12.
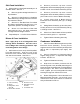
3. From inside of Cab, insert Wiper Arm Shaft
on Wiper Motor through hole in Lower Windshield
Mount and Windshield. Secure with rubber gasket,
washer, and nut. Secure R.H. side of Windshield
Wiper Motor to Lower Windshield Mount with 1/4"
x 3/4" flange screw and flange locknut. Slide
Windshield Wiper Arm onto Windshield Wiper
Motor shaft. NOTE: Be sure that the Wiper Arm
is 5° above the horizontal position when
installed to insure proper operation.
4. Connect Wiper Motor Wire Harness to
Windshield Wiper Motor and route down the side
of the Rops Bar, under floor and up through
Harness opening. Route black wire over to ground
stud on drivers side support post and secure with
existing nut. Route red wire to Coolant Temperature
Gauge and attach to positive(+) terminal
(connection with green wire w/red stripe from
vehicle harness). See Wiring Diagram on Page 4.
5. Remove the (2) 1/4" flange screws in the
lower Door Backing Angle on the L.H. Front Rops
post. Place (2) 2412-91 R-Clamps around the
Wiper Motor Wire Harness and secure to the Lower
Door Backing Angle and L.H. Front Rops using
(2) flange screws just removed.
6. Tighten all hardware securely.
Rear Window & Doors Installation:
NOTE: All hardware is to be initially installed
loosely, unless otherwise stated, for ease of
fit and adjustment.
NOTE: Two people may be needed for
installation of Rear Window and Doors.
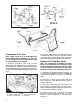
1. Slide Rear Window into Enclosure Cover
Assembly, making sure the top of the Rear
Window is in the groove. Secure Rear Window to
Rear Rops Bar and Rear Cab Panel using (2) Rear
Window Clamps, (2) R-Clamps, (9) 1/4" flange
screws and (3) flange locknuts. NOTE: The (3)
screws going through the Rear Cab Panel and
bottom of Rear Window require the (3) flange
locknuts. Start at the top and work down when
tightening screws. See FIG. 11.
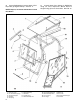
FIG. 11
1. Rear Window Clamp 3. Rear Cab Panel
2. Rear Window 4. R-Clamps
1
2
3
4
6
5
1035
1
2
3
"%
4