
Installation Instructions
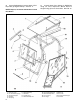
9
System Charging:
The Federal "Clean Air Act" of 1992 requires
that anyone who services a vehicle's air
conditioning system must be certified to
perform any such work. Your regional EPA
(Environmental Protection Agency) may supply
you with more details regarding these
regulations, certification programs and/or
agencies authorized to perform vehicle air
conditioning certification.
The air conditioning system on this unit should
be charged by a certified automotive A/C
technician. The system should be evacuated
for a minimum of 45 minutes prior to charging.
The system capacity is approximately 3.25 lbs.
of R134a refrigerant. The serviceable parts are
shown in the Parts List.
Each compressor is delivered filled with the
specified quantity of compressor oil. A label
describing the amount and type of compressor oil
is attached to the compressor.
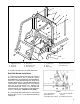
NOTE: The Door Backing Angles are slotted
for adjustment.
4. All areas around door need to be adjusted
to insure a snug fit, it is suggested that the Plate
at the bottom of the door be one of the final
adjustments.
5. TIGHTEN ALL HARDWARE SECURELY.
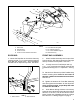
6. Locate the Gas Springs and remove the
retaining clip from each Gas Spring. Save
retaining clips for future installation.
7. Attach Gas Springs to Right and Left Door
Assemblies and Enclosure Cover by snapping
socket end of Spring onto Ball Stud on Door
Brackets. NOTE: The Rod End from the Gas
Spring will attach to the Ball Stud on the Door.
The Gas Spring Body will attach to the Ball Stud
on the Gas Spring Support. See FIG. 12.
8. After installation of Gas Springs, reinstall
retaining clips onto Gas Spring body where earlier
removed.
NOTE: No retaining clip is required on Rod
End to allow for easier Door removal.
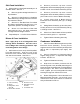
IMPORTANT! DO NOT USE KNIVES, BLADES,
OR SCRAPERS TO REMOVE THE
PROTECTIVE PAPER AS THIS WILL SCRATCH
OR CUT THE DOORS AND WINDOWS!
9. Remove the protective paper from the
Windshield, Rear Window, and Doors by grasping
paper at one corner and gently pulling away the
protective paper.
LATCH ADJUSTMENT:
1. Close doors with Latch in the "up" position.
2. Rotate Door Latch Handle towards Door
Latch Plate. If Door Latch Handle fails to
contact Door Latch Plate, it may be necessary to
slightly bend the Door Latch in order to secure
Door to Door Latch Plate.
3. Reconnect negitive cable to battery.