
Installation Instructions


3
InstallingtheRinseTank
Partsneededforthisprocedure:
2Rinse-tankstrap
2Bolt
4Washer
2Locknut
1
Carriagebolt
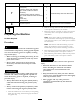
PreparingtheTank
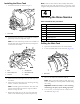
1.Loosentheboltssecuringthevalvemountingrailto
theframe(Figure6).
G014231
1
2
Figure6
1.Mountingrail2.Bolt
2.Movethemountingrailrearward.
Note:Thisisasmalladjustmentthatallowsspacefor
installingtherinsetank.
3.Tightentheboltstosecurethemountingrailinthis
positionontheframe.
4.Torquetheboltsto40N∙m(30ft-lb).
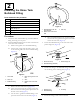
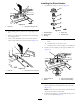
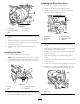
5.Disconnectthesupplyhoseattherearandtopofthe
maintank(Figure7).
G014232
1
2
3
4
5
6
7
Figure7
1.Locknut5.Right-reartankstrap
2.Bolt
6.Retainingfork
3.Washer
7.Supplyhose
4.Locknut
6.Removetheretainingforksecuringthettingand
removethehose;retainallparts.
7.Removethefastenerssecuringthereartankstrapsat
thetopofthetank;retainallparts.
8.Removetheinboardlocknutsecuringthewiretanklid
stoptotheleft,rearstrap;retainlocknut.
InstallingtheHardwareforthe
Rinse-TankStraps
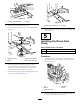
1.Installacarriagebolttotheinboardholeontheright
reartankstrap(Figure8).
Thecarriageboltontherearlefttankstrapshouldpass
throughtheopenloopofthewiretanklidstop.
G014286
1
2
3
Figure8
1.Carriagebolt
3.Inboardhole
2.Right-reartankstrap
2.Installthetankstrapfastenersremovedpreviouslyto
securethestrapstothetank.
Makesurethatthestrapissecuretothetank.Donot
overtighten.
5