
Installation Instructions


2
Steps 2 and 8 only pertain to vehicles with serial
numbers 240000001 and up.
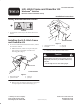
2. Remove the clamp securing the hoses to the R.H. rear
frame rail (Fig. 3).
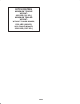
1
Figure 3
1. Clamp
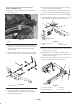
3. Disconnect and remove the hydraulic quick couplers
from the quick coupler bracket at the rear of the vehicle
(Fig. 4). Note the position of the hoses in the quick
coupler bracket.
4. Remove the (2) capscrews and lock nuts securing the
quick coupler bracket to the vehicle frame tube (Fig. 4).
1
Figure 4
1. Quick coupler bracket
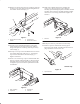
5. Using the (2) capscrews and lock nuts previously
removed, install the new quick coupler bracket to the
vehicle frame tube (Fig. 5).
6. Remove the quick coupler fittings and the 90 fittings
from the rear hydraulic hoses (Fig. 5).
7. Install a new 45 fitting to each of the rear hydraulic
hoses and re–install the quick coupler fittings (Fig. 5).
Note: Make sure the O–rings are positioned in the fittings.
8. Mount the hydraulic quick couplers to the quick coupler
bracket and connect the hydraulic hoses (Fig. 5).
1
2
3
4
Figure 5
1. Quick coupler bracket
2. Hoses
3. Wire tie
4. Rear frame tube
9. Secure the hoses, unclamped in step 2, to the rear frame
tube with a wire tie (Fig. 5).
10. Position hitch frame assembly onto vehicle frame,
aligning holes in rear mounting brackets with holes in
each side of frame (Fig. 6).
11. Secure each side of hitch frame to rear of vehicle frame
with a clevis pin and two lynch pins (Fig. 6).
2
4
1
3
Figure 6
1. Vehicle frame channel
2. Hitch frame assembly
3. Clevis pin
4. Lynch pin