
Operator's Manual


10
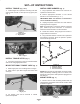
SET-UP INSTRUCTIONS
INSTALL TONGUE (Fig. 1 & 2)
1. Install tongue into topdresser receiving tube and
secure each end with a clevis pin and (2) lynch pins
(Fig. 1).
Figure 1
1. Front of Tongue
2. Tongue hitch
1
2
Figure 2
1. Rear of Tongue
1
INSTALL TONGUE HITCH (Fig. 1)
1. Level the tongue hitch to the tow vehicle drawbar
and secure using appropriate holes.
MOUNT OPTIONAL TONGUE JACK (Fig. 3)
1. Slide tongue jack onto mounting tube on tongue.
2. Align holes in jack with tongue and secure with
clevis pin.
Figure 3
1. Tongue jack
1
3. For storage, jack can be removed or rotated
upward and pinned.
INSTALL WIRE HARNESS (Fig. 4)
1. Plug topdresser wire harness into connector on
topdresser solenoid valve.
2. Secure appropriate terminals of tow vehicle
harness to tow vehicle battery (+ or -).
IMPORTANT: Make sure harness is connected to
correct terminals on battery.
3. Unplug loop back connectors from each harness
and plug harness's together.
Note: To prevent dirt or corrosion to harness connector
pins, Install loop back connectors to connectors
whenever vehicle harness's are disconnected.
4. Route wire harness' along tongue and secure to
tongue with wire connectors.
5. Plug controller harness connector into topdresser
wire harness connector. Route to operator's position
and secure along frame rail.
Figure 4
1. Topdresser harness
2. Controller harness
3. Tow vehicle harness
1
100-7882
10
2
3
NOTE: Wire harness has removable connectors which
allow permanently installing portion on vehicle, and
leaving the other portion with topdresser plugged in to
the solenoid.
MOUNT SKIDS (Fig. 5)
1. Mount a skid to each mounting bracket with (2)
carriage bolts, flat washers and locknuts. Position skids
as shown in figure 5.
Figure 5
1. Skid (4)
1
1