
Operator's Manual


13
Adjusting the Blower Belt
Make sure belt is properly tensioned to ensure proper
operation of the machine and unnecessary wear. Check belt
frequently.
Note: Check/adjust the blower belt tension after the first 20
hours of operation.
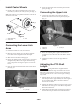
1. Remove the 3 capscrews, 6 washers, and 3 nuts
securing the belt guard to the blower housing (Fig. 14).
Remove the guard.
Note: The drive shaft does not have to be disconnected to
adjust the belt.
1
Figure 14
1. Belt guard
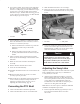
2. Remove capscrew and nut securing tensioner guide to
blower frame(Fig. 15). Belt tension will be released
when capscrew is removed.
1
4
2
3
Figure 15
1. Belt tensioner tube
2. Tensioner guide
3. Capscrew location
4. Idler arm
3. On back side of frame, loosen capscrew securing belt
tensioner to frame.
4. Position a large wrench on tensioner. Rotate tensioner
clockwise until decal is aligned with 15_ on tensioner
tube.
5. Insert capscrew into aligned guide holes and secure
with nut. If holes are not exactly aligned, rotate guide to
the next higher hole until aligned.
6. Tighten capscrew securing, on back side of frame to
lock tensioner.
7. Install the belt guard to the blower housing with the
capscrews, washers, and nuts.