
Operator's Manual


9
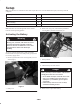
5. Slowly pour electrolyte into each cell until the
electrolyte level is up to the lower part of the tube
(Fig. 3).
1
2
3
1262
Figure 3
1. Filler caps
2. Electrolyte
3. Lower part of the tube
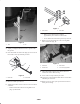
6. Leave the covers off and connect a 3 to 4 amp battery
charger to the battery posts (Fig. 4).
7. Charge the battery at a rate of 4 amperes or less for 4
hours (12 volts).
4
1
2
3
1254
Figure 4
1. Positive post
2. Negative post
3. Charger red (+) wire
4. Charger black (–) wire
Charging the battery produces gasses that can
explode.
Never smoke near the battery and keep sparks and
flames away from battery.
Warning
8. When the battery is fully charged, disconnect the
charger from the electrical outlet and from the negative
and positive battery posts (Fig. 4).
9. Slowly pour electrolyte into each cell until the level is
once again up to the upper line on the battery case
(Fig. 3) and install covers.
10. Install the battery into the chassis (Fig. 2).
11. Secure the battery in the chassis with the battery
holddown, rods, and wing nuts (Fig. 2).
12. Using the bolt and wing nut supplied with the battery,
connect the positive (red) cable to the positive (+)
battery post (Fig. 2). Slide the rubber cover over the
battery post.
13. Using the bolt and wing nut supplied with the battery,
connect the negative (black) cable to the negative (–)
battery post (Fig. 2).
Note: Ensure that the battery cables do not contact any
sharp edges or each other.
Connecting cables to the wrong post could
result in personal injury and/or damage to the
electrical system. Make sure battery or cables
do not interfere or rub on any moving or hot
parts.
Warning
Mount Debris Blower To Tow
Vehicle
To assure proper operation, make sure debris blower frame
is parallel with the ground.
1. Position debris blower on a flat, level surface.
2. Insert jack onto frame pin and secure with pin (Fig. 5).