
Operator's Manual


G014153
1
Figure4
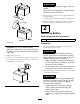
1.Electrolyte
Important:Donotoverllthebattery.
Electrolytewilloverowontootherpartsofthe
machineandseverecorrosionanddeterioration
willresult.
6.Replacetheventcaps.
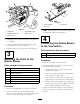
7.Connecta3to4ampbatterychargertothebattery
posts(
Figure5).Chargethebatteryatarateof3to
4amperesfor4to8hours.
Figure5
WARNING
Chargingthebatteryproducesgassesthatcan
explode.
Neversmokenearthebatteryandkeepsparks
andamesawayfrombattery.
8.Aftercharging,removetheventcapsandcheckthe
electrolytelevel.
9.Ifneeded,lleachcelltotheproperlevel(
Figure4).
10.Whenthebatteryischarged,disconnectthecharger
fromtheelectricaloutletandthebatteryposts.
2
InstalltheBattery
Partsneededforthisprocedure:
A/RPetroleumjelly(notsupplied)
Procedure
1.Slidethebatteryintothebatteryboxwiththe
terminalstowardtheengine.
WARNING
Batteryterminalsormetaltoolscouldshort
againstmetalprocessorcomponentscausing
sparks.Sparkscancausethebatterygassesto
explode,resultinginpersonalinjury.
•Whenremovingorinstallingthebattery,do
notallowthebatteryterminalstotouchany
metalpartsofthemachine.
•Donotallowmetaltoolstoshortbetweentry
terminalsandmetalpartsofthemachine.
2.Attachthenegativecable(blackcable)tothenegative
(-)terminalofthebattery.
WARNING
Incorrectbatterycableroutingcoulddamage
theblowerandcablescausingsparks.Sparks
cancausethebatterygassestoexplode,
resultinginpersonalinjury.
•Alwaysdisconnectthenegative(black)
batterycablebeforedisconnectingthe
positive(red)cable.
•Alwaysconnectthepositive(red)battery
cablebeforeconnectingthenegative(black)
cable.
9