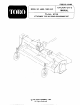
FORM NO. 954863 OPERATOR’S MODEL NO.
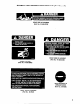
FOREWORD Thank you for buying a high quality Toto turf care product. To get the best performance from this machine, operate and maintain it according to the instructions in this manual. | Toto also wants to stress the importance of safely. You and anyone else using or maintaining this machine are strongly urged to read this manual, especially all the safety instructions. DANGER, WARNING and CAUTION, used with the triangular safety alert symbol, highlight safety messages.
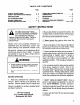
TABLE OF CONTENTS Page Page SAFETY INSTRUCTIONS OPERATING CHARACTERISTICS SAFETY AND INSTRUCTION DECALS LUBRICATION. .. SPECIFICATIONS .. 6 MAINTENANCE SETUP INSTRUCTIONS 6-7 STORAGE . . BEFORE OPERATING -9 IDENTIFICATION AND ORDERING .. 13 OPERATING INSTRUCTIONS . 9 WARRANTY. . Back Cover SAFETY INSTRUCTIONS The safety alert symbol means CAUTION, WARNING or DANGER “personal safety instruction”. Read and understand the instruction because it has o do with safety.
SAFETY INSTRUCTIONS (Continued) 9. if cutting blades strike a solid object or the machine vibrates abnormally, disengage PTO, move throttle to SLOW, set parking brake and shut engine off. Remove key from switch to prevent possibility of accidental starting. Check cutting unit and traction unit for damage and malfunctioning parts. Repair any damage before restarting the engine and operating the Flail 2760. Be sure cutting blades are in good condition and blade bolts are torqued to proper specifications. 10.
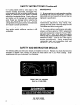
SAFETY AND INSTRUCTION DECALS (Continued) A DANGER ROTATING MEMBERS CAN CAUSE PERSONAL INJURY. DO NOT OPERATE UNLESS SHIELDS N PLACE, REAR SIDE OF HOUSING (Part No. 01-506-0130) R NG A Lol GUARDS ARE IN PLACE. A A RIO FRONT SIDE OF HOUSING {Part No. ON BELT GUARD {Part No. 01-506-0040) TO AVOID INJURY FROM LOSS OF STEERING CONTROL AND FORWARD STABILITY DUE TO THE WEIGHT DECK MUST BE LOWERED WHEN GOING DOWN HILLS *2WD: GM 32ND INSTALL 70 LBS. REAR WEIGHT GIVE 345 INSTALL 105 LBS.
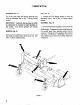
SPECIFICATIONS ROTOR: 144 Knives Rotor Speedup RPM Gator 3/186" wall {10cm x .47 cm wall) Rotor Overbearing" (3.8 cm) CASTORS: Swivel castors DRIVE: Gearbox 50 HP Drive Belt 2 3V Section Belts CUTTING HEIGHT: cm) in 1/2" REAR ROLLER: 5" (127 cm) O.D. BEARINGS: 3 self sealed and self aligning DIMENSIONS: Cutting Width: 60" Overall Width: 68.5" Weight: 480 Ibs. SET UP INSTRUCTIONS ATTACH FLAIL TO 300 SERIES GROUNDSMASTER® (Fig. 1) WARNING + Left and right hand push arm on Grounds master is spring loaded.
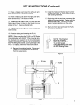
SET UP INSTRUCTIONS (Continued) 11. Have a helper push down the left push arm; then remove the 2" x 4" blocks of wood. 12. Have a helper push down the right push arm; then remove the 2" x 4" blocks of wood. 13. Attach the Left Hand Chain (15 links) and the Right Hand Chain (4 links) to the Center Arm as shown in Fig. 1. Secure shackle bolts. 14. Adjust chain links to get the FLAIL to raise and lower evenly. 15. Practice raising and lowering the FLAIL.
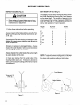
‘BEFORE OPERATING INSPECT BLADES (Fig. 3) A4\ CAUTION » Sharp edges of mower blades can cut you. ALWAYS wear gloves for any type of blade maintenance or adjustment. 1. Follow these instructions before operating: Always inspect all the blades before using the Fail. Make sure all the bolts are tight and torqued 18 21st. Lbs. Operating the Flail with missing or damaged cutter blades can cause severe vibration and damage to other components. Sharpen or replace any damaged blades.
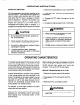
OPERATING INSTRUCTIONS INTERLOCK SWITCHES The Grounds master has interlock switches in the electrical system. These switches are designed to stop the engine when operator gets off the seat while either the PTO lever is engaged or traction pedal is depressed. However, the operator may get off the seat while engine is running. Although engine will continue to run if PTO lever is disengaged and traction pedal is released, it is strongly recommended that the engine be stopped before dismounting from the seat.
. LUBRICATION BEARINGS (Fig. §) The FLAIL has three self sealing bearings that must be lubricated with a No. 2 Lithium based grease. IMPORTANT: Lubricate the bearings as often as necessary fo maintain a slight leakage on the seals. Too much grease can cause overheating. WHEELS (Fig. 5) Under normal conditions, grease the wheels and the wheel pivot tubes every 50 hours of use. Use a No. 2 Lithium based grease. PTO (Fig. 5) 1. Grease the PTO fittings weekly or every 40 operating hours. Use a No.
MAINTENANCE BLADE MAINTENANCE CAUTION « Sharp edges of mower blades can cut you. ALWAYS wear gloves for any type of blade maintenance or adjustment. INSPECT BLADES ALWAYS inspect the condition of the blades before every use. Inspect the shackles and blades to be sure they are in good operating condition.. Sharpen or replace any damaged blades. Always replace the cutter blades in sets to avoid excessive and damaging vibration of the rotor.
MAINTENANCE (Continued) 20. Slowly move the Grounds master forward and lower the Flail 2760 until the holes on the skid shoes line up with the holes on the side of the main frame. Turn off engine and remove the key. 21. Replace all six bolts attaching the Skid Shoes {0 the mainframe and secure. 22. Replace the belt. 23. Using the adjustment nut on the spring rod, set the tension of the belt. 24. Replace the Belt Guard and secure ADJUSTING BELT DRIVE (Fig.
STORAGE 1. Thoroughly clean the FLAIL 2760. The housing should be free of dirt, leaves and debris. 2. Lubricate all grease fittings. Wipe off any excess lubricant. 3. Place a light coat of grease on the splines of the PTO adapter. 4. Tighten all fasteners. 5. Check the condition of the cutter blades. Replace any damaged blades. Tighten all fasteners. Refer to the Maintenance section of this Operator's Manual for specifications. 6. Check the tension and the condition of the drive belt. Replace if worn, 7.
The Toto Commercial Products Two Year Limited Warranty The Toto Company warrants your 1996 or newer Toto Commercial Product ("Product™) purchased after January 1, 1897, to be free from defects in materials or workmanship for the period of time listed below*. Where a warrant able condition exists, Toto will repair the Product at no cost to you including diagnosis, labor, parts, and transportation. This warranty begins on the date the Product is delivered to the original retail purchaser.