FORM NO. 3318-452 GB MODEL NO.
FOREWORD Thank you for buying a high-quality Toro turf care product. To get the best performance from this machine , operate and maintain it according to the instructions in this manual. Toro also wants to stress the importance of safety. You and anyone else using or maintaining this machine are strongly urged to read this manual, especially all the safety instructions. DANGER, WARNING and CAUTION, used with the triangular safety alert symbol, highlight safety messages.
Safety Instructions of drugs or alcohol. The safety alert symbol means CAUTION, WARNING or DANGER —"personal safety instruction". Read and understand the instruction because it has to do with safety. Failure to comply with the instruction may result in personal injury. Hazard control and accidental prevention are dependent upon the awareness, concern, and proper training of the personnel involved in the operation, transport, maintenance, and storage of the machine.
Safety Instructions MAINTENANCE 11. Be sure the machine is in safe operating condition by keeping nuts, bolts and screws tight. Check the blade bolts and nuts frequently to be sure they are tightened to specification. 12. If the engine must be running to perform a maintenance adjustment, keep hands, feet, clothing and other parts of the body away from the Flail blades and other moving parts. 13.
Safety Instructions Rotating members can cause serious personal injury. Do not operate machine unless shield is in place. Rotating pulleys and belts can cause serious personal injury.
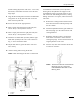
Specifications ROTOR: 144 Knives Rotor Speed—2300 RPM Rotor—4" OD x 3/16" wall (10 cm x .47 cm wall) Rotor Bearings—1.25" (3.8 cm) CUTTING HEIGHT: 0-4"(0-10 cm) in 1/2" (1.2 cm) increments REAR ROLLER: 5" (12.7 cm) O.D BEARINGS: 3 self-sealed and self-aligning CASTORS: Swivel castors DRIVE: Gearbox—50 HP Drive Belt—2 3V Section Belts DIMENSIONS: Cutting Width: 60" (152 cm) Overall Width: 69.5" (176.5 cm) Weight: 480 lbs. (179 kg) Set-Up Instructions ATTACH FLAIL TO 300 SERIES GROUNDSMASTER (Fig.
Set-Up Instructions FLAIL housing (B). Fasten with 7/16"x 1-1/2" bolts, flatwashers, lockwashers and nuts. Leave the bolts finger tight. 9. Align the Flail 2760 parallel with the Groundsmaster using either one of the push-arm ends. Secure the bolts on the left push arm. 10. Secure the bolts on the right push arm. 11. Have a helper push down the left push arm; then remove the (5 x 10 cm) blocks of wood. Groundsmaster with the 88" (223.
Before Operating INSPECT BLADES CAUTION Sharp edges of the mower blades can cut you. ALWAYS wear gloves for any type of blade maintenance or adjustment. SET HEIGHT OF CUT (Fig. 4) The height of cut is set by moving the height-of-cut bolt on the roller bracket and moving the front spacers on the wheel shaft. The number of spacers in the chart represent the number of spacers UNDER the main arm. See Fig. 4. The drawing shows the unit with a roller position of 2 and 2 spacers. 1.
Operating INTERLOCK SWITCHES The Groundsmaster has interlock switches in the electrical system. These switches are designed to stop the engine when the operator leaves the seat while either the PTO lever is engaged or the traction pedal is depressed. However, the operator may get off the seat while engine is running. Although engine will continue to run if the PTO lever is disengaged and traction pedal is released, it is strongly recommended that the engine be stopped before dismounting from the seat.
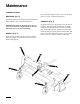
Maintenance LUBRICATION PTO (Fig . 5) BEARINGS (Fig. 5) Grease the PTO fittings weekly or every 40 operating hours. Use a No. 2 Lithium based grease. The FLAIL has three self-sealing bearings that must be lubricated with a No. 2 Lithium based grease. GEARBOX (Fig. 5) IMPORTANT: Lubricate the bearings as often as necessary to maintain a slight leakage on the seals. Too much grease can cause overheating . WHEELS (Fig.
Maintenance BLADE MAINTENANCE CAUTION The sharp edges of the mower blades can cut you. ALWAYS wear gloves for any type of blade maintenance or adjustment. INSPECT BLADES 7. Start the engine on the Groundsmaster. Slowly lift the 2760 Flail until the main frame is above the rotor. 8. Slowly back up the Groundsmaster until the main frame is clear of the rotor. Lower the main frame to ground level. NOTE: If rotating the Rotor assembly continue to Step 9. If replacing only the blades skip to step 19.
Maintenance Turn off the engine and remove the key. STORAGE 21. Replace all six bolts attaching the skid shoes to the mainframe and secure. 1. Thoroughly clean the FLAIL 2760. The housing should be free of dirt, leaves and debris. 22. Replace the belt. 2. Lubricate all grease fittings. Wipe off any excess lubricant. 23. Using the adjustment nut on the spring rod, set the tension of the belt. 3. Place a light coat of grease on the splines of the PTO adapter. 24. Replace the belt guard and secure. 4.