
Operator's Manual


Page 34
How to Maintain the Conveyor Belt
System
Conveyor Belt and Rollers
o Check that the conveyor belt is tracking straight on
the rollers and does not slip. Make adjustments if
necessary. See the Conveyor Belt Tracking
Procedure in this manual.
o Check the front and rear roller bearings every two
months for wear or visible damage.
o Check the condition and tension of the drive chain
and the sprockets.
I
MPORTANT: Check for trapped spreading material
between conveyor bed, belt, and rollers. See How to
Wash the ProPass in this manual.
Conveyor Belt Tensioning Procedure
Perform the tensioning procedure only if the belt is
slipping, if it has been replaced, or if it has been loosened
to replace other parts.
1. Place the belt’s V-guide in the guides of the front
and rear rollers.
2. Tighten the two belt adjustment nuts evenly until the
belt is snug. (If necessary, remove the front idler
roller cover and the rear chute cover).
3. Fully load the ProPass with the heaviest material you
expect to use.
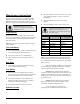
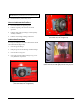
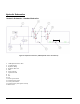
4. With two wrenches, hold the end of the tensioner rod
stationary and then loosen the locking nut, which is
the nut closest to the end of the rod (Figure 19).
Locking Nut Adjuster Nut
Figure 19: Tensioner rod and locking nuts
5. Turn the conveyor belt on and check if the belt is
slipping.
6. If so, stop the belt and tighten both adjuster nuts half
a turn. Do not over-tension.
7. Repeat steps 5 and 6 until the conveyor belt stops
slipping.
8. Tighten the locking nuts and install the yellow safety
covers.
Conveyor Belt Tracking Procedure
The conveyor belt system is self-tracking. Both the front
and rear rollers have a groove in the middle for the belt’s
V-guide to run in. Sometimes, the belt may track outside
the grooves. To track the belt:
1. Determine which side the belt is tracking towards.
2. Remove the yellow safety covers from both front
corners.
3. On the side the belt is tracking towards, hold the end
of the tensioner rod stationary, then loosen the
locking nut and tighten the adjuster nut by two flats
of the nut. See Figure 19.
4. Tighten both locking nuts and turn on the conveyor
belt.
5. Check the tracking movement. Repeat the above
steps until the belt tracks back to the correct position.