
Setup Instructions


Page 6
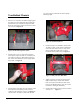
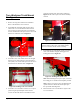
12. Slide the hitch tube into the channel and attach with
two 19mm x 139.7mm (¾” x 5-½”) bolts with 19mm
(¾”) washers. Be sure to use 19mm (¾”) washers on
both sides of the hitch crimp and a 19mm (¾”)
Nylon lock nut. Torque the hitch bolts to 20 kg-m
(150ft-lbs), see Figure 18.
Figure 18: Hitch Installed
13. With all the bolts in the Tow Chassis double
checked, align your tow chassis with the desired tow
vehicle. Using the jack on the hitch tube, raise the
hitch until the Tow Chassis is level.
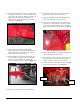
14. Install the hitch clevis so the top of the chassis is as
level as possible. Use the two 15.9mm x 114.3mm
(5/8” x 4-½”) bolts with the corresponding flat
washers and nylon lock nuts as shown in Figure 19.
Figure 19: Aligned Hitch Clevis
15. Torque the clevis bolts to 17.0 kg-m (120ft-lbs).
16. Double check that all bolts on the Tow Chassis are
tight and that no components are missing.
17. Using the lifting mechanism in the ProPass hopper,
position the ProPass over the Tow Chassis.
18. Line up the six mounting holes (three per side) and
install the 7.9 x 25.4 mm (5/16 x 1 in) bolts with the
nylon lock nuts and two flat washers (one on either
side) to the Tow-Behind Chassis. Refer to Figure 20.
Figure 20: Mounting onto chassis
19. Remove the lifting bracket from the hopper sides and
reinstall the bolts to the hopper sides.
20. Identify the return hose (contains a check valve) and
the pressure hose included with the Tow-Behind
Chassis. These are shown in the parts manual.
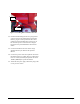
21. Connect the hoses to the ProPass as shown in Figure
21. For Wireless ProPass, refer to Figure 22.
Figure 21: Installing Hoses on ProPass
Pressure
Return