
Installation Instructions


Installation
CAUTION
BeforeattemptingtoinstalltheProPass-11HP
HydraulicPowerPack,ensurethat:
•TheProPassislocatedonrmlevelground.
•TheProPassjackstandislowered.
•Allexternalhydraulicandelectricalpower
sourcesaredisconnected.
•TheProPassshouldbepreventedfrom
unexpectedmovementbyblockingthewheels
atthefrontandtherear.
•UseanassistantwhenliftingthePowerPack
assembly.
1.FollowingtheinstructionsgivenintheProPass
Operator’sManual.RemovetheTwinSpinneroption
andsecurethehydraulicpowerandreturnhoses.
Note:ProPassmodelsmanufacturedafterApril
2005featureapre-drilledchassisrearwall.Ifyour
ProPassispre-drilledskipinstructions2-13.
2.CheckthattheProPasschassisrearwallisclearto
mountthehydraulictank.
Note:Twomountingboltsmustberemovedfrom
thechassisrearwalltoallowthehydraulictanktobe
mounted.Usetheboltsformountingthetank.
3.Removethehydraulictankassemblyfromthecrate.
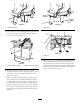
4.Supportthehydraulictankfromunderneathand
positionthetankagainsttheProPasschassisrear
wall.Thetankshouldbecenteredevenlyfromleftto
rightandshouldbepositionedvertically(
Figure1).
Figure1
1.Hydraulictank
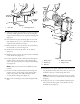
5.Ensurethattheinletandoutletttingsandthe
hoseguidemountingbracketalltcleanlywithin
theroundholesintheProPasschassisrearwall
(Figure2).
Figure2
1.Holesinthechassis
6.Ensurethatthehydraulictankislevel.
7.UsingC-clamps,orsimilardevices,temporarily
clampthehydraulictankrmlyinplaceonthe
ProPasschassisrearwall.
8.Recheckthatthehydraulictankislevel.
9.Markthepositionofthehydraulictankmounting
holesontotheProPasschassisrearwall.
10.Un-clampandremovethehydraulictank.
11.Centerpunchthepositionofthemarkedholes.
12.Drilla7/16inchdiameterholethroughtheProPass
chassisrearwallineachmarkedandpunched
position.
13.De-burreachhole.
14.EnsurethattheProPassHitchTubeiscleanandfree
fromdirtordebris.
15.Unpacktheengineassembly.
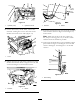
16.Loosen,butdonotremove,the(2)boltsandnuts
securingtheenginemountbracketstotheengine
mountingplate(
Figure3).
2