
Installation Instructions

Important:Thiskitcanonlybeappliedto
aProPassthatisequippedasatow-behind
machine.
PreparingtheMachine
CAUTION
Installingthekitbeforedisconnectingall
externalhydraulicandelectricalsources
mayexposeyoutoelectricshockand/or
pressurizedhydraulicuid,causingserious
injuryordeath.
Beforeinstallingthepowerpack,disconnect
allexternalhydraulicandelectricalpower
sources.
1.Parkthemachineonalevelsurface,lowerthe
jackstand,disconnectthemachinefromthe
tractionunit,andchockthefrontandbackofthe
wheels.
2.FollowingtheinstructionsgivenintheOperator’s
Manualforthemachine,removetheTwin
Spinnerandsecurethehydraulicpowerand
returnhoses.
Important:SomeProPassmodelshavea
pre-drilledchassisrearwall.Ifyourmachine
hasapre-drilledchassisrearwall,referto
MountingtheEngine(page4).
3.Removeandretainthe2mountingboltsfrom
thechassisrearwalltoallowthehydraulictank
tobemounted.
4.Ensurethatthechassisrearwallisfreetomount
thehydraulictank.
5.Removethehydraulictankassemblyfromthe
crate.
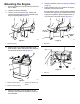
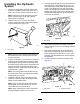
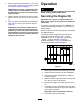
6.Supportthehydraulictankfromunderneathand
positionthetankagainstthechassisrearwall.
Thetankshouldbecenteredevenlyfromleftto
rightandshouldbepositionedvertically(Figure
1).
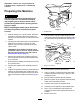
g013856
Figure1
1.Hydraulictank
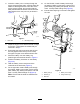
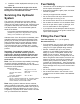
7.Ensurethattheinletandoutletttingsandthe
hoseguidemountingbracketalltcleanlywithin
theroundholesinthechassisrearwall(Figure
2).
g013857
Figure2
1.Holesinthechassis
8.Ensurethatthehydraulictankislevel.
9.UsingC-clamps,orsimilardevices,temporarily
clampthehydraulictankrmlyinplaceonthe
chassisrearwall.
10.Ensurethatthehydraulictankisstilllevel.
11.Markthepositionofthehydraulictankmounting
holesontothechassisrearwall.
12.Unclampandremovethehydraulictank.
13.Centerpunchthepositionofthemarkedholes.
14.Drilla7/16inchdiameterholethroughthe
chassisrearwallineachmarkedandpunched
position.
15.De-burreachhole.
3