
Setup Instructions


Page 4 Setup Instructions
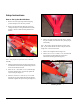
Figure 8: Remove bolts and nuts from rear gate
16. Install the rear gate into position at the rear of the
MH-400 (Figure 8).
17. Install both 7.8 x 50 mm (5/16 x 2 in) bolts and
nylon locking nuts back into the rear gate assembly.
18. Remove the protective wrapping from the the mirror
assembly and adjust it into position.
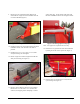
19. Tip the MH-400 back. Refer to Figure 9.
Figure 9: MH-400 tipped backward
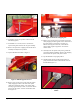
20. Remove two 7.8 mm (5/16 in) nuts from the option
caddy shipping brackets on the side of the option
caddy that contains the wheels. The option caddy
will drop approximately 25 mm (1 in) and the wheels
will rest on the ground. Set nuts and washers aside.
See Figure 10.
Figure 10: Removal of shipping nuts
21. Remove two 7.8 mm (5/16 in) nuts from the option
caddy shipping brackets opposite to the wheel side of
the option caddy as shown above in Figure 10.
Before removing the second nut, ensure that the
option caddy weight is supported. Set nuts and
washers aside.
22. Carefully lower the option caddy to the ground and
set aside for future installation. Remove the shipping
brackets from the option caddy and set aside.
23. Tip the MH-400 to its upright position.
24. On SH models plug the on/off pendant switch (4-
prong end) into the socket at the front left corner of
the MH-400 (Figure 11).
Figure 11: Plug in on/off pendant switch on SH
Models