
Operator's Manual


Description
Qty.
Use
DeclarationofConformity
1
Attachmentclamps2Usetomountattachments
Note:Determinetheleftandrightsidesofthemachine
fromthenormaloperatingposition.
1
InstallingtheHitch
Partsneededforthisprocedure:
2
Bolt,1x6–1/2inch
2Locknut,1inch
Procedure
1.Locateandremovetheloosepartsboxshippedonthe
fender.
2.Removetherearsupportlegfromtheshippingposition
andplaceitinthedownposition.
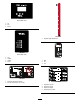
3.Removethehitchfromtheshippingpositionbycutting
bothstrapssecuringthehitchtothefender(Figure3).
Removebothmountingbracketsfromthefenderand
discard.
Figure3
1.Removehitchfromshippingposition
Note:Twopeoplearerequiredtoremovethehitch
assembly.
4.Slidethehitchtubetongueintoplaceatthefrontof
themachine.Ensurethatthejackmountingbracket
facesouttowardstheleftside.
5.Placeone1x6–1/2inchboltthroughtheframeand
hitchtubeandinstallthelocknut(
Figure4).
6.Placethesecond1x6–1/2inchboltthroughthetop
oftheframeanddownthroughthehitchtube.Install
thelocknut(
Figure4).
Figure4
1.Hitchtube2.Mountingboltandnut
7.Removethejackassemblyfromtherearleg.Install
thejackassemblyontothehitchtube,placingthepin
horizontally.
Note:Donotplacethepinthroughthetopholeof
thejack,oryouwillnotbeabletoremovethepinwhen
theweightcaseissecuredtothehitch.
2
InstallingtheWeightCase
NoPartsRequired
Procedure
1.Removetheweightsfromtheweightcase.
2.Removethe1/2x5–1/2inchboltsfromthemounting
bracketholdingtheweightcase.Discardthemounting
brackets(
Figure5).
10