
Setup Instructions


Page 2 Setup Instructions
Setup Instructions
How to Set Up the MH-400 Base
1. Remove the rear support leg from the shipping
position and place it in the down position.
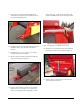
2. Remove the hitch from the shipping position by
cutting both straps securing the hitch to the fender
(Figure 1). Remove both mounting brackets and
discard.
Figure 1: Remove hitch from shipping position
Note – Two people are required to remove the hitch
assembly.
3. Slide the hitch tube tongue into place at the front of
the MH-400. Ensure that the jack mounting bracket
faces out towards the left side.
4. Place one 25 x 162.5 mm (1 x 6½ in) bolt through
the frame and hitch tube, and securely tighten the
nylon locking nut (Figure 2).
5. Place the second 25 x 162.5 mm (1 x 6½ in) bolt
through the top of the frame and down through the
hitch tube. Tighten the nylon locking nut (Figure 2).
Figure 2: Bolt hitch to frame
6. Remove the jack assembly from the rear leg. Install
the jack assembly onto the hitch tube, placing the pin
horizontally.
Note – Do not place the pin through the top hole of the
jack, or you will not be able to remove the pin when the
weight case is secured to the hitch.
7. Remove the weights from the weight case.
8. Remove the 12.5 x 137.5 mm (½ x 5½ in) bolts from
the mounting bracket holding the weight case.
Discard the mounting bracket (Figure 3).
Figure 3: Remove bolts from weight case
mounting bracket