
Setup Instructions


Setup Instructions Page 3
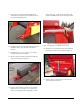
9. Remove the two option attachment clamps from
underneath the weight case and install them onto the
rear of the MH-400 (Figure 4).
Figure 4: Install option attachment clamps
10. Install the weight case on the hitch (look for the hitch
installation decal), as far forward on the hitch as
possible.
11. Install the two 12.5 x 137.5 mm (½ x 5½ in) bolts
and nylon locking nuts and tighten.
12. Fill the weight case with the weights and install the
safety bar and safety pin (Figure 5).
Figure 5: Fill weight case
13. Remove option caddy legs from rear cross member.
Remove the 12.5 x 127 mm (¼ x 5 in) bolts, nuts,
washers, and strapping before attempting to remove
option caddy legs. Set the option caddy legs aside
for future installation. Please refer to Figure 6 below.
Figure 6: Removing Option Caddy Legs
Note – Two people are required for the next step.
14. Remove the rear gate from the front of the MH-400
by lifting one of the corners up and out (Figure 7).
Figure 7: Remove the rear gate
15. Remove both 7.8 x 50 mm (5/16 x 2 in) bolts and
nylon locking nuts (Figure 8).