
Operator's Manual


Setup
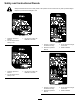
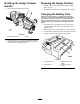
Cutthezip-tieawayfromyourbodyandremoveitfromthetrigger
handle(Figure1).
Figure1
1.Zip-tie
Operation
Important:Thebatterypackisnotfullychargedwhenitis
purchased.Beforeusingthehedgetrimmerfortherst
time,placethebatterypackinthechargerandchargeituntil
theLEDindicatorsturngreen.Makesuretoreadallsafety
precautions.Withregularuse,itwillneedshortercharging
time.Ifstoringforaprolongedperiodoftime,removethe
battery.Whenreadytouseagain,chargethebatterypack
untiltheLEDindicatorsturngreen.
StartingtheHedgeTrimmer
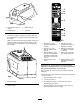
1.Removetheprotectivecoverfromthecutterblades(Figure
2).
WARNING
Thehedgetrimmerbladescancausecutsor
amputation.
Becarefulwhenhandlingthehedgetrimmerwith
theprotectivecoverremoved.
Figure2
1.Protectivecover
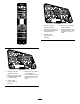
2.Alignthetongueofthebatterypackwiththecavityinthe
handlehousing(Figure3).
Figure3
1.Auxiliaryhandle5.Triggerhandle
2.Auxiliaryhandletrigger6.Tongue
3.Lockswitch7.Latch
4.Trigger
3.Graspthetriggerhandle(Figure3).
4.Pushthebatterypackintothehandleuntilthelatchlocks
intoplace.
Important:Thebatterypackisnotfullychargedwhenit
ispurchased.Beforeusingthehedgetrimmerforthe
rsttime,placethebatterypackinthechargercharge
untiltheLEDindicatorsturngreen.Makesuretoreadall
safetyprecautions.Withregularuse,itwillneedshorter
chargingtime.Ifstoringforaprolongedperiodoftime,
removethebattery.Whenreadytouseagain,charge
thebatterypackuntiltheLEDindicatorsturngreen.
5.Placeonehandonthetriggerhandle.Placetheotherhand
ontheauxiliaryhandleandpresstheauxiliaryhandletrigger
(Figure3).
6.Slidethelockswitchbackwards,towardsyou,thensqueeze
thetriggerswitchtoturnonthehedgetrimmer(Figure3).
Note:Thetrimmerwillstayonaslongasthetriggerandthe
auxiliaryhandletriggeraresqueezed.Thelockswitchmay
bereleasedoncehedgetrimmerisrunning
6