
Operator's Manual
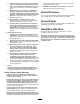
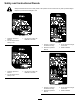
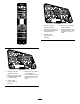

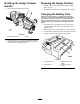
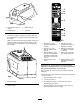


Figure6
1.LEDindicators(levelof
charge)
3.Batteryterminal
2.Releasebutton4.Testbutton
3.Slidethebatteryintothechargeruntilitclicksintoplace.
4.Toremovethebattery,holddownthecharger,pullupon
thereleasebutton,andslidethebatterybackwardsoutof
thecharger.
Note:Ifyouhavetroubleremovingthebattery,applysome
dielectricgreasetothebatteryterminals(Figure7).Do
notuseanytypeoflubricantasitcancausedamageto
theterminals.
Figure7
1.Batteryterminals
5.RefertoFigure8tointerprettheLEDindicatorsonthe
batterycharger.
0
0
0
0
Figure8
1.Redlighton;green
lightashing—batteryis
charging.
5.Redlightoff;green
lightashing—batteryis
preparingforstorage.
2.Redlighton;green
lighton—batteryisfully
charged.
6.Redlightoff;greenlight
on—batteryisprepared
forstorage.
3.Redlightashing;green
lightoff—abnormalbattery
temperature(greaterthan
40C(104F)orlessthan5
C(41F).
7.Redlighton;greenlight
off—nobatteryinserted.
4.Charge/storagemode
switch
8.Redlightashing;green
lightashing—batteryis
defective.
Important:Ifthechargerindicatesanabnormalbattery
temperature,allowthebatterytocoolorwarmupasneeded
beforeinsertingthebatteryintothecharger.
Storingalithium-ionbatteryat40%ofitscapacitymaximizes
batterylife.
Usestoragemode(Figure8)whenthebatterywillnotbeusedfor
1monthorlonger.
1.Insertthebatteryintothecharger.
2.Turnstoragemodeon.
3.Thebatterywillchargeordischargeasnecessaryto
approximately40%charge.
4.Whenthebatteryisreadyforstorage(Figure8,item6.),
removethebatteryfromthecharger.
8