
Service Manual


SERVICE
INSTRUCTIONS
1.41 REPLACE DRIVER
ALL UNITS EXCEPT 1978 CORDLESS
(fig. 1.41
a)
Remove the spool. Unscrew the core,
with driver, from the motor shaft. Gently
release the pressure the spring
is
applying
against the spool core. To install the new
driver, reverse procedures.
Figure 1.41
a
CORDLESS 8000001
&
UP
(fig.
1.41
b)
On the Cordless Trimmer (Serial No.
8000001-9115104)
a
white driver was
pressed on
at
the factory. Pry off the
driver to remove
it.
Note: If the driver
is
beige colored Cordless Trimmer (Serial
No. 9115105
&
up),
it
is
threaded onto
the motor shaft. Replace the white driver
by firmly pushing
it
on the motor shaft,
while rigidly supporting the opposite end
of the motor shaft. Note that the motor
shaft and white driver both have
a
flat
side.
Figure 1.41 b
1.5 CHECK FOR DIRTY OR DAMAGED
CORE
(fig.
1.5)
Figure 1.5
4
,-
Inspect the spool core after removing the
spool cap. Look for broken or worn teeth
that would allow the driver to skip. A build-
up
of
dirt inside the core would stop the
driver from indexing.
1.51 CLEAN OR REPLACE CORE
Remove and replace core
as
driver replace-
ment in section 1.41.
1.6 1978 CORDLESS TRIMMER -CHECK FOR
DRUM RUBBING MOTOR
(fig.
1.6)
The head assembly was "press-fit" on the
motor shaft up to the heat sink.
It
could
possibly be hitting against the base of the
motor.
.
Figure
1.6
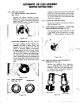
1.61 REPLACE DRUM AND MOTOR WITH
NEW STYLE
(fig.
1.61)
Replace the
# 88140
Motor Assembly
with
a
# 88150 Motor Assembly and
# 88151 Automatic Line Feed Assembly.
To replace these components, please re-
fer to section
2.6
and
2.7.
88140~188141 88150w/88151
Figure
1.6
1