
Operator's Manual

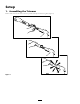


2. Installing the Guard
Snap the guard into place ( Figure 2 ).
Figure 2
Operation
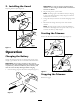
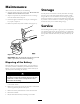
Charging the Battery
Charg e the batter y for 24 hours or until the c harg e light on the
c harg er is g reen before the first use and after eac h use thereafter .
Important: Al w ays charge the batter y after each use.
Storing the unit with a discharged batter y will r educe the life
of y our batter y . T his lead-acid batter y has no memor y and
does not need to be full y discharged bef or e charging .
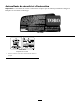
1. Inser t the c harg e plug into the trimmer rece ptacle ( Figure 3 ).
Figure 3
Important: Use onl y the charger supplied with the
trimmer or a T or o charger obtained fr om an Authoriz ed
T or o Ser vice Dealer .
2. Plug the c harg er into a po w er outlet.
Note: T he c harg e light is red while the batter y is c harging;
it tur ns g reen when the batter y is fully c harg ed or when the
trimmer is not connected.
3. Charg e the batter y for 24 hours or until the c harg e light tur ns
g reen.
4. Disconnect the c harg er from the po w er outlet and the
trimmer .
Note: T he c harg e light is alw a ys on when the trimmer is
connected to the c harg er and to the po w er outlet; it sta ys on
ev en after the batter y is fully c harg ed.
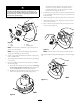
Starting the Trimmer
Push in the side button and then pull the trig g er ( Figure 4 ).
Figure 4
Stopping the Trimmer
R elease the trig g er .
4