
Use and Care Manual


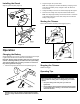
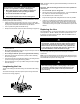
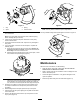


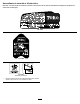

Figure7
1.Cap3.Spring
2.Spool
4.Trimmerhead
Note:Youmayneedascrewdrivertopressinthetabsonthecap
ofanewtrimmer.
Note:Ifthespringfallsoffthetrimmerhead,installthespring
beforeinstallingthespoolandcap.
2.Ifthereisanycuttinglineleft(thereshouldbeashortpiece),
removeanddiscardit.
3.Thoroughlycleanthetrimmerhead.Inspectforanydamagedor
wornparts.
4.Ifyouarewindinganewlineontotheoldspool,completethe
followingsteps:
A.Hookoneendoflineintotheslotonthespool,allowingno
morethan1/8inchtoprotrude,andpushtheendoftheline
allthewaytotheinnerendoftheslot.
B.Windthelineinthedirectionofthearrowonthespool,inlevel
rows,betweenthespoolanges(Figure8).
Figure8
Thetrimmerwillnotfunctionproperlyifthelineiswoundinthe
wrongdirection,theendofthelineprotrudesmorethan1/8
inch,orthelineiswoundbeyondtheouteredgesofthespool.
5.Unwindnomorethan3inchesoflinefromspool(eithernewor
re-wound)andholdthelineandspooltopreventthelinefrom
unraveling.
6.Whileholdingthelineandspool,placethecaponthespool.
7.Insertthelineintotheeyelet,aligningthecaptabswiththeslots
inthecutterhead.
8.Pressinthetabsandpushdownthecapandspooltolockthe
capinplace(Figure9).
Figure9
Note:Youmayneedtorotatethespooltofullyinstallit.
ThefullyinstalledcuttingheadshouldappearasshowninFigure10.
Figure10
Maintenance
Aftereachuseofthetrimmer,dothefollowing:
•Wipethetrimmercleanwithadampcloth.Donothosethe
trimmerdownorsubmerseitinwater.
•Wipeorscrapecleananyaccumulationofdirtorcuttingsfromthe
trimmerheadandspool.
•Checkandtightenallfasteners.Ifanypartisdamagedorlost,
repairorreplaceit.
•Removeanydebrisawayfromairintakevents(Figure11).
6