Form No. 3424-865 Rev A PowerPlex 14in 40V MAX String Trimmer Model No. 51482—Serial No. 319000001 and Up Model No. 51482T—Serial No. 319000001 and Up Register at www.Toro.com.
Important: With your mobile device, you can scan the QR code (if equipped) on the serial number plate to access warranty, parts, and other product information. If you have questions or problems, call toll free 1-800-237-2654 (US) or 1-800-248-3258 (Canada) before returning this product. WARNING CALIFORNIA Proposition 65 Warning The power cord on this product contains lead, a chemical known to the State of California to cause birth defects or other reproductive harm. Wash hands after handling.
Safety E. Dress properly. Do not wear loose clothing or jewelry. Keep your hair, clothing and gloves away from moving parts. Loose clothes, jewelry, or long hair can be caught in moving parts. F. Keep your hands and feet away from the cutting area. 3. Power tool use and care A. Do not force the power tool. Use the correct power tool for your application. The correct power tool will do the job better and safer at the rate for which it was designed. B.
conditions and the work to be performed. Using the power tool for operations different from those intended could result in a hazardous situation. 4. J. Keep guards in place and in working order. K. Check for damaged parts. Before further use of the appliance, a guard or other part that is damaged should be carefully checked to determine that it will operate properly and perform its intended function.
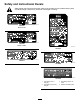
Safety and Instructional Decals Safety decals and instructions are easily visible to the operator and are located near any area of potential danger. Replace any decal that is damaged or missing. decal136-2465 136-2465 Model 51482 decal136-2466 136-2466 Model 51482T decal136-2473 136-2473 decal136-2471 136-2471 decal138-6694 138-6694 decal136-2476 136-2476 5 1. The battery pack is charging. 3. The battery pack is too warm. 2. The battery pack is fully charged. 4. Replace the battery pack.
decal136-2539 136–2539 1. Charge the battery where the temperature is between 0°C and 40°C (32°F and 104°F). decal136-2533 136-2533 1. Warning—read the Operator’s Manual; keep away from moving parts; keep all guards and covers in place; wear eye protection; do not operate in wet conditions. decal136-2534 136-2534 1. The battery does not come out of the box fully charged. 4. Stop—follow these instructions before first use. 2. Place the battery in the battery charger. 5. Read the Operator’s Manual.
Setup Loose Parts Use the chart below to verify that all parts have been shipped. Procedure 1 2 3 4 Description Use Qty. No parts required – Mount the battery charger (optional). Connector knob 1 Unfold the handle. Auxiliary handle 1 Install the auxiliary handle. Guard Phillips head screw 1 4 Install the guard. Note: The battery pack is not fully charged when you purchase it. Before using the tool for the first time, refer to Charging the Battery Pack (page 11).
2 Unfolding the Handle Parts needed for this procedure: 1 Connector knob Procedure 1. Unfold the handle (A of Figure 3). 2. Install the connector knob to secure the handle (B of Figure 3). Note: The nut that holds the handle connector knob in place is lightly secured in the connector housing with a piece of tape. Remove the tape after you install the connector knob.
3 4 Installing the Auxiliary Handle Installing the Guard Parts needed for this procedure: Parts needed for this procedure: 1 Auxiliary handle 1 Guard 4 Phillips head screw Procedure Procedure 1. Line up the groove along the handle with the groove on the auxiliary handle and slide the auxiliary handle toward the trimmer handle (A of Figure 4). 2. Snap the handle securely into place (B of Figure 4).
Product Overview Operation Specifications Starting the Trimmer 1. Appropriate Temperature Ranges Charge the battery at 0°C (32°F) to 40°C (104°F)* Use products at -15°C (5°F) to 60°C (140°F) Store products at -15°C (5°F) to 60°C (140°F) Unplug the charger if Below 0°C (32°F) or above 40°C (104°F) Make sure that the vents on the trimmer are clear of any dust and debris. *Charging time will increase if you do not charge the battery within this range.
Shutting Off the Trimmer To shut off the trimmer, release the trigger. Whenever you are not using the trimmer or are transporting the trimmer to or from the work area, remove the battery pack. Removing the Battery Pack from the Trimmer Press the battery latch on the machine to release the battery pack and slide the battery pack out of the machine (Figure 9). g228487 Figure 10 1. Battery pack cavity 2. Battery pack terminals 4. Battery-charge-indicator button 5. LED indicators (current charge) 3.
Left Light Right Light Adjusting the Auxiliary Handle Indicates: Off Red Charger is on; no battery pack inserted Red Red Battery pack is charging Green Red Battery pack is charged Orange Red Battery pack is too warm Red Blinking Red Replace the battery pack 1. Release the auxiliary-handle latch (A of Figure 13). 2. Slide the auxiliary handle up or down to your desired height (B of Figure 13). Important: Do not remove the rubber bumper. Advancing the Line Using the Bump Feed 1.
Operating Tips • Keep the trimmer tilted toward the area being cut; this is the best cutting area. • The string trimmer cuts when you move it from left to right. This prevents the trimmer from throwing debris at you. • Use the tip of the string to do the cutting; do not force the string head into uncut grass. • Wire and picket fences can cause the string to wear rapidly and even break. Stone and brick walls, curbs, and wood can also cause the string to wear rapidly. • Avoid trees and shrubs.
Maintenance Replacing the Spool After each use of the trimmer, complete the following: Use only 2 mm (0.08 inch) diameter monofilament string. Use the original manufacturer’s replacement string for best performance (Toro Part No. 88546). 1. Remove the battery from the trimmer. 2. Wipe the trimmer clean with a damp cloth. Do not hose the trimmer down or submerge it in water. Important: Using a larger diameter string causes the motor to overheat and fail. CAUTION 1. Remove the battery. 2.
Storage Replacing the String 1. Remove the battery. Important: Store the tool, battery pack, and 2. Remove the spool; refer to Replacing the Spool (page 14). charger only in temperatures that are within the appropriate range; refer to Specifications (page 10). Important: If you are storing the tool for a year or longer, remove the battery pack from the tool and charge the battery pack until 2 or 3 LED indicators turn blue on the battery. Do not store a fully charged or fully depleted battery.
Troubleshooting Perform only the steps described in these instructions. All further inspection, maintenance, and repair work must be performed by an authorized service center or a similarly qualified specialist if you cannot solve the problem yourself. Problem The tool does not start. Possible Cause Corrective Action 1. The battery is not fully installed in the tool. 1. Remove and then replace the battery into the tool, making sure that it is fully installed and latched. 2.
Problem Possible Cause Corrective Action An audible tone sounds when advancing the line using the bump feed. 1. This is a normal occurrence. 1. Stop the tool by releasing the trigger and then start the tool. It is difficult to remove the battery pack from the tool. 1. The battery pack/tool is new or there is corrosion in the battery terminals and/or the terminals on the tool. 1. Clean the terminals on the battery pack and the tool.
Notes:
California Proposition 65 Warning Information What is this warning? You may see a product for sale that has a warning label like the following: WARNING: Cancer and Reproductive Harm—www.p65Warnings.ca.gov. What is Prop 65? Prop 65 applies to any company operating in California, selling products in California, or manufacturing products that may be sold in or brought into California.