
Operator's Manual


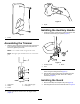
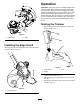


Figure17
1.Directionofrotation3.Stringpath
2.Idealcuttingrange
Maintenance
Aftereachuseofthetrimmer,completethefollowing:
1.Removethebatteryfromthetrimmer.
2.Wipethetrimmercleanwithadampcloth.Donothosethe
trimmerdownorsubmergeitinwater.
CAUTION
Thelinecut-offbladeonthedeectorissharpand
cancutyou.Donotuseyourhandstocleanthe
deectorshieldandblade.
3.Wipeorscrapecleanthecuttingheadareaanytimethereis
anaccumulationofdebris.
4.Checkandtightenallfasteners.Ifanypartisdamagedor
lost,repairorreplaceit.
5.Brushdebrisawayfromairintakeventsonmotorhousing
topreventthemotorfromoverheating.
ReplacingtheSpool
Useonly1.6mm(.065inch)diametermonolamentstring.Use
originalmanufacturer’sreplacementstringforbestperformance
(Toropartnumber88532or88524).
Important:Useofalargerdiameterstringwillcause
themotortooverheatandfail.
1.Removethebattery.
2.Pushinthetabsonthesideofthespoolretainer(Figure18).
1
2
3
4
G015663
Figure18
1.Spoolretainer3.Slots
2.Spool
4.Tabs
3.Pullthespoolretaineruptoremoveit,andremovethespool.
4.Toinstallthenewspool,makesurethestringiscapturedin
oneoftheretainingslotsonthenewspool.Makesurethe
endofthestringextendsapproximately152mm(6inches).
5.Installthenewspoolsothatthestringalignswiththeeyelet
inthestringhead.Threadthestringintotheeyelet.
6.Pullthestringextendingfromthestringheadsothatthe
stringreleasesfromtheslotinthespool.
7.Installthespoolretainerbydepressingtabsintoslotsand
pushingdownuntilthespoolretainerclicksintoplace.
ReplacingtheString
1.Removethebattery.
2.Removethespool.SeeReplacingtheSpool(Figure18).
10