Form No. 3415-823 Rev B Power Plex™ 24in 40V MAX Hedge Trimmer Model No. 51491—Serial No. 317000001 and Up Model No. 51491T—Serial No. 317000001 and Up Register at www.Toro.com.
Safety If you have questions or problems, call toll free 1-888-367-6631 (US) or 1-888-430-1687 (Canada) before returning this product. WARNING Failure to follow all warnings and instructions may result in electric shock, fire and/or serious injury. Read all safety warnings and all instructions. WARNING Save all warnings and instructions for future reference.
working conditions and the work to be performed. Using the power tool for operations different from those intended could result in a hazardous situation. part of the power tool may result in personal injury. E. Do not overreach. Keep proper footing and balance at all times. This enables better control of the power tool in unexpected situations. F. Dress properly. Do not wear loose clothing or jewelry. Keep your hair tied back and your clothing and gloves away from moving parts.
• metal parts of the power tool “live” and could give you an electric shock. DANGER—Keep your hands away from blade. Contact with blade will result in serious personal injury. • • Additional Safety Warnings • Keep hands and feet away from the cutting device • • • • • • • • • • • • • • • • at all times and especially when switching the product on. Do not try to grasp or remove trimmings when the product is running.
• Protect the battery pack against heat. Do not • Never attempt to open the battery pack for any place the battery in direct sunlight or use or store the battery inside cars in hot weather. Doing so may cause the battery to generate heat, explode or ignite. reason. If the plastic housing of the battery pack breaks open or cracks, immediately discontinue its use and do not recharge it.
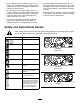
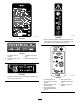
decal136-2533 decal136-2473 136-2533 136-2473 1. Warning—read the Operator’s Manual; keep away from moving parts; keep all guards and covers in place; wear eye protection; do not operate in wet conditions. decal136-2476 136-2476 1. The battery pack is charging. 3. The battery pack is too warm. 2. The battery pack is fully charged. 4. Replace the battery pack. decal136-2539 136–2539 decal136-2534 1. Charge the battery where the temperature is between 0°C and 40°C (32°F and 104°F). 136-2534 1.
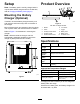
Setup Product Overview Note: The battery pack is not fully charged when it is purchased. Before using the tool for the first time, refer to Charging the Battery Pack (page 9). Mounting the Battery Charger (Optional) If desired, mount the battery charger securely on a wall using the wall-mount key holes on the back of the charger. g204357 Figure 2 Left Side of Hedge Trimmer Mount it indoors (such as a garage or other dry place), near a power outlet, and out of the reach of children. 1. Blades 2.
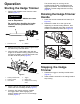
Operation The trimmer stays on as long as the auxiliary-handle switch is engaged and the trigger is squeezed. The lock switch may be released once the hedge trimmer is running (Figure 4). Starting the Hedge Trimmer 1. Remove the protective cover from the cutter blades (Figure 3). Rotating the Hedge Trimmer Handle WARNING The hedge trimmer blades can cause cuts or amputation. Be careful when handling the hedge trimmer with the protective cover removed. 1.
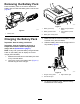
Removing the Battery Pack Press the battery latch on the tool to release the battery pack and slide the battery pack out of the tool (Figure 6). g192748 Figure 7 1. Battery pack cavity g194190 Figure 6 2. Battery pack terminals 1. Battery latch 4. Battery-charge-indicator button 5. LED indicators (current charge) 3. Battery pack venting areas Charging the Battery Pack 3. Make sure that the vents on the battery charger are clear of any dust and debris. Important: Read all safety precautions. 4.
6. Operating Tips Refer to the following table to interpret the LED indicators on the battery charger. Left Light Right Light • Use the power tool for cutting in either direction in Indicates Off Red Charger is on; no battery pack inserted Red Red Battery pack is charging Green Red Battery pack is charged Orange Red Battery pack is too warm Red Blinking Red Replace the battery pack a slow, sweeping action from side to side. • Stand so that you are stable and balanced on both feet.
Maintenance • To reduce the risk of serious personal injury, do Disconnect the product from the power supply (i.e. remove the plug from the power supply or the battery pack) before maintenance or cleaning work. • Store the tool, battery pack, and battery charger Use only the manufacturer’s recommended replacement parts and accessories. Preparing the Battery Pack for Recycling not store the battery pack outside or in vehicles. in an enclosed clean, dry area. Inspect and maintain the product regularly.
Troubleshooting Perform only the steps described in these instructions. All further inspection, maintenance, and repair work must be performed by an authorized service center or a similarly qualified specialist if you cannot solve the problem yourself. Problem The tool does not start. Possible Cause Corrective Action 1. The battery is not fully installed in the tool. 1. Remove and then replace the battery into the tool, making sure that it is fully installed and latched. 2.
Problem Possible Cause Corrective Action 1 LED indicator is blinking on the battery pack. 1. The battery pack voltage is low. 1. Place the battery pack on the charger. It is difficult to remove the battery pack from the tool. 1. The battery pack/tool is new or there is corrosion in the battery terminals and/or the terminals on the tool. 1. Clean the terminals on the battery pack and the tool.
Notes:
Notes:
The Toro Promise - Electric Products A Three-Year1 Full Warranty for Residential Use for the United States and Canada The Toro Company and its affiliate, Toro Warranty Company, pursuant to an agreement between them, jointly warrant this product for three years against defects in material or workmanship when used for normal residential purposes.* 1 Does not include the battery. 1 Year Battery Warranty for Residential Use.