
Operator's Manual


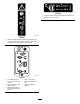

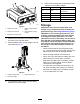


g228487
Figure8
1.Batterypackcavity4.Battery-charge-indicator
button
2.Batterypackterminals
5.LEDindicators(current
charge)
3.Batterypackventingareas
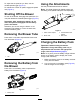
3.Makesurethattheventsonthebatterycharger
areclearofanydustanddebris.
4.Slidethebatterypackintothechargeruntilitis
fullyseated(Figure9).
g194423
Figure9
1.Chargerventingareas
3.Rightindicatorlight
2.Leftindicatorlight
5.Toremovethebatterypack,slidethebattery
backwardoutofthecharger.
6.RefertothefollowingtabletointerprettheLED
indicatorsonthebatterycharger.
LeftLight
RightLight
Indicates:
Off
Red
Chargerison;nobattery
packinserted
RedRedBatterypackischarging
Green
RedBatterypackischarged
Orange
RedBatterypackistoowarm
RedBlinkingRedReplacethebatterypack
Storage
Important:Storethetool,batterypack,and
chargeronlyintemperaturesthatarewithinthe
appropriaterange;refertoSpecications(page7).
Important:Ifyouarestoringthetoolforayear
orlonger,removethebatterypackfromthetool
andchargethebatterypackuntil2or3LED
indicatorsturnblueonthebattery.Donotstorea
fullychargedorfullydepletedbattery.Whenyou
arereadytousethetoolagain,chargethebattery
packuntiltheleftindicatorlightturnsgreenon
thechargerorall4LEDindicatorsturnblueon
thebattery.
•Disconnecttheproductfromthepowersupply
(i.e.,removetheplugfromthepowersupplyorthe
batterypack)andcheckfordamageafteruse.
•Cleanallforeignmaterialfromtheproduct.
•Whennotinuse,storethetool,batterypack,and
batterychargeroutofthereachofchildren.
•Keepthetool,batterypack,andbatterycharger
awayfromcorrosiveagents,suchasgarden
chemicalsandde-icingsalts.
•T oreducetheriskofseriouspersonalinjury,do
notstorethebatterypackoutsideorinvehicles.
•Storethetool,batterypack,andbatterycharger
inanenclosedclean,dryarea.
9