
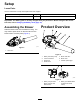
Operator's Manual


g267488
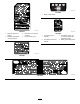
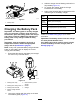
Figure9
1.Batterylatch
ChargingtheBatteryPack
Important:Thebatterypackisnotfullycharged
whenyoupurchaseit.Beforeusingthetoolfor
thersttime,placethebatterypackinthecharger
andchargeituntiltheLEDdisplayindicatesthe
batterypackisfullycharged.Readallsafety
precautions.
Important:Chargethebatterypackonlyin
temperaturesthatarewithintheappropriate
range;refertoSpecications(page8).
Note:Atanytime,pressthebattery-charge-indicator
buttononthebatterypacktodisplaythecurrent
charge(LEDindicators).
1.Ensurethattheventsonthebatteryandcharger
areclearofanydustanddebris.
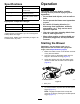
g330066
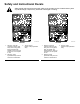
Figure10
1.Batterypackcavity
5.LEDindicators(current
charge)
2.Batterypackventingareas6.Handle
3.Batterypackterminals
7.Charger
4.Battery-charge-indicator
button
2.Lineupthechargerwiththecavityontheback
ofthebatterypack(Figure10).
3.Slidethechargerintothebatterypackuntilitis
fullyseated(Figure10).
4.Toremovethecharger,slidethecharger
backwardoutofthebattery.
5.RefertothefollowingtabletointerprettheLED
indicatorlightonthebatterycharger.
Indicator
light
Indicates
Off
Nobatterypackinserted
Green
blinking
Batterypackischarging
Green
Batterypackischarged
Red
Batterypackand/orbatterychargerisoverorunder
theappropriatetemperaturerange
Red
blinking
Batterypackchargingfault*
*RefertoTroubleshooting(page12)formore
information.
Important:Thebatterycanbeleftonthecharger
forshortperiodsbetweenuses.
Ifthebatterywillnotbeusedforlongerperiods,
removethebatteryfromthecharger;referto
Storage(page11).
10