Form No. 3436-756 Rev D Flex-Force Power System™ 24in 60V Hedge Trimmer Model No. 51840—Serial No. 320000001 and Up Model No. 51840T—Serial No. 320000001 and Up Register at www.Toro.com.
Important: With your mobile device, you can scan the QR code (if equipped) on the serial number plate to access warranty, parts, and other product information. For assistance, please see www.Toro.com/support for instructional videos or contact 1-888-384-9939 before returning this product. WARNING CALIFORNIA Proposition 65 Warning The power cord on this product contains lead, a chemical known to the State of California to cause birth defects or other reproductive harm. Wash hands after handling.
Safety Use of a cord suitable for outdoor use reduces the risk of electric shock. 6. WARNING Read all safety warnings, instructions, illustrations and specifications provided with this power tool. III. Personal safety Failure to follow the warnings and instructions may result in electric shock, fire and/or serious injury. 1. Stay alert, watch what you are doing and use common sense when operating a power tool.
2. 3. Disconnect the plug from the power source and/or remove the battery pack, if detachable, from the power tool before making any adjustments, changing accessories, or storing power tools. Such preventive safety measures reduce the risk of starting the power tool accidentally. 4. Store idle power tools out of the reach of children and do not allow persons unfamiliar with the power tool or these instructions to operate the power tool. Power tools are dangerous in the hands of untrained users. 5.
VII. Hedge trimmer safety warnings 1. Keep all parts of the body away from the blade. Do not remove cut material or hold material to be cut when blades are moving. Blades continue to move after the switch is turned off. A moment of inattention while operating the hedge trimmer may result in serious personal injury. 2. Carry the hedge trimmer by the handle with the blade stopped and taking care not to operate any power switch.
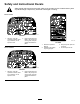
Safety and Instructional Decals Safety decals and instructions are easily visible to the operator and are located near any area of potential danger. Replace any decal that is damaged or missing. Model 51840 decal139-5251 139-5251 1. Warning—read the Operator’s Manual; wear eye protection; do not expose to rain. 2. Keep hands away from blade—stay away from moving parts; keep all guards and shields in place. decal137-9454 137-9454 1. Read the Operator’s Manual. 2.
decal137-9462 137-9462 decal137-9461 137-9461 1.
Setup Product Overview Important: The battery pack is not fully charged when it is purchased. Before using the machine for the first time, refer to Charging the Battery Pack (page 11). Mounting the Battery Charger (Optional) g308470 If desired, mount the battery charger securely on a wall using the wall-mount key holes on the back of the charger. Figure 4 Left side of the machine shown. Mount it indoors (such as a garage or other dry place), near a power outlet, and out of the reach of children.
Specifications Operation Model 51840/T Cutting Length 610 mm (24 inches) Rated Voltage 60V DC maximum, 54 VDC nominal usage No-load Speed 3200 spm at 60 VDC max Cutting width 19 mm (3/4 inch) Charger Type 88602 (included with 51840), 88605, or 88610 Battery Type 88625 (included with 51840), 88620, 88640, 88650, 88660, or 88675 Starting the Hedge Trimmer 1. Remove the protective cover from the blades (Figure 6). WARNING The hedge trimmer blades can cause cuts or amputation.
5. Shutting Off the Hedge Trimmer Press the lock switch and then squeeze the trigger switch while engaging the auxiliary-handle switch to turn on the hedge trimmer (Figure 7). To shut off the hedge trimmer, release the trigger, auxiliary-handle switch, or both (Figure 7). Allow at least 5 seconds for the cutting blade to stop moving. The trimmer stays on as long as the auxiliary-handle switch is engaged and the trigger is squeezed.
Charging the Battery Pack Important: The battery pack is not fully charged when you purchase it. Before using the tool for the first time, place the battery pack in the charger and charge it until the LED display indicates the battery pack is fully charged. Read all safety precautions. Battery pack and/or battery charger is over or under the appropriate temperature range Red blinking Battery pack charging fault* *Refer to Troubleshooting (page 13) for more information.
Maintenance Storage Remove the battery pack before maintenance or cleaning work. Important: Store the tool, battery pack, and charger only in temperatures that are within the appropriate range; refer to Specifications (page 9). Use only the manufacturer’s recommended replacement parts and accessories. Important: If you are storing the battery pack for the off-season, remove the battery pack from the tool and charge the battery pack until 2 or 3 LED indicators turn green on the battery.
Troubleshooting Perform only the steps described in these instructions. All further inspection, maintenance, and repair work must be performed by an authorized service center or a similarly qualified specialist if you cannot solve the problem yourself. Problem The tool does not start. Possible Cause Corrective Action 1. The battery is not fully installed in the tool. 1. Remove and then replace the battery into the tool, making sure that it is fully installed and latched. 2.
Notes:
California Proposition 65 Warning Information What is this warning? You may see a product for sale that has a warning label like the following: WARNING: Cancer and Reproductive Harm—www.p65Warnings.ca.gov. What is Prop 65? Prop 65 applies to any company operating in California, selling products in California, or manufacturing products that may be sold in or brought into California.