Form No. 3378-721 Rev. A 17 in. String Trimmer - Curved Shaft Model No. 51958—314000001 & Up 18 in. String Trimmer - Straight Shaft Model No. 51978—314000001 & Up NOTICE Do not use E15, E20, or E85 fuel (or fuel containing greater than 10% ethanol) in this product. It is a violation of federal law and will damage the unit and void your warranty. If you have questions concerning your trimmer, please call us at 866-574-9242 (US) or 866-574-9243 (Canada).
STOP READ THIS INFORMATION Before you use your new trimmer, read the following helpful hints to get you started. Fueling WARNING: Gasoline and its vapors are highly flammable and explosive. To prevent serious personal injury and property damage, handle it with care. Keep away from ignition sources and open flames, handle outdoors only, do not smoke and wipe up spills immediately. 1. Obtain a clean container that is approved for use with gasoline. 2.
Table of Contents Introduction....................................................................................................................................................................................4 General Safety Rules.................................................................................................................................................................. 5-6 Specific Safety Rules............................................................................................
Introduction Thank you for purchasing a Toro product. We would like for you to be completely satisfied with your new product, so feel free to contact an authorized service dealer for help with service, genuine Toro parts, or other information you may require. Whenever you contact an authorized service dealer, always know the model and serial numbers of the product. These numbers will help the service representative provide exact information about your specific product.
General Safety Rules WARNING: Read and understand all instructions. Failure to follow all instructions may result in electric shock, fire and/or serious personal injury. Read All Instructions For safe operation, read and understand all instructions before using this product. Follow all safety instructions. Failure to follow all safety instructions listed below, can result in serious personal injury.
Allow the engine to cool; empty the fuel tank into a container approved for fuel and secure the unit from moving before transporting in a vehicle. Wear your protective equipment and observe all safety instructions. For units equipped with a clutch, be sure the cutting attachment stops turning when the engine idles. When the unit is turned off make sure the cutting attachment has stopped before the unit is set down. Specific Safety Rules Specific Safety Rules For Trimmer Use Inspect before use.
Symbols The following signal words and meanings are intended to explain the levels of risk associated with this product. Symbol Signal Meaning DANGER: Indicates an imminently hazardous situation, which, if not avoided, will result in death or serious injury. WARNING: Indicates a potentially hazardous situation, which, if not avoided, could result in death or serious injury. CAUTION: Indicates a potentially hazardous situation, which, if not avoided, may result in minor or moderate injury.
Product Labels Product labels and instructions are easily visible to the operator and are located near any area of potential danger. Replace damaged or lost labels. Part No. 940686148 Part No. 940864003 ON STOP Part No. 940657032 Part No. 940657034 50' 15m Handle Position Part No.
Features Product Specifications Name Specification Engine 25.4cc Full Crank Cutting Width Model No. 51958 17 in. Model No. 51978 18 in. Line Size .095 in. Weight Model No. 51958 11.6 lbs. Model No. 51978 12.5 lbs.
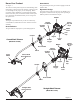
Know Your Product Grass Shield See Figure 1. The grass shield prevents grass from wrapping around the trimmer shaft. The safe use of this product requires an understanding of the information on the tool and in this operator’s manual as well as a knowledge of the project you are attempting. Before use of this product, familiarize yourself with all operating features and safety rules, in both this manual and the operator’s manuals for all attachments that your are using with this power head.
Assembly Unpacking This product requires assembly. n Carefully remove the product and any accessories from the box. Make sure that all items listed in the packing list are included. WARNING: Do not use this product if any parts on the packing list are already assembled to your product when you unpack it. Parts on this list are not assembled to the product by the manufacturer and require customer installation. Use of a product that may have been improperly assembled could result in serious personal injury.
Connecting the Attachment to the Upper Shaft See Figure 2. WARNING: Never install, remove, or adjust any attachment while power head is running. Failure to stop the engine can cause serious personal injury. Never operate power head without an attachment. WARNING: Be certain the knob is fully tightened before operating equipment; check it periodically for tightness during use to avoid serious personal injury. The attachment connects to the power head by means of a coupler device.
Attaching the Grass Deflector Attaching the grass deflector differs depending on the type of trimmer: curved shaft or straight shaft. To Attach the Straight Shaft Grass Deflector Model No. 51978 See Figure 5. Follow these steps to attach the straight shaft grass deflector. 1. Stop the engine and disconnect the spark plug wire. WARNING: The line cut-off blade on the grass deflector is sharp. Avoid contact with the blade. Failure to avoid c ontact can result in serious personal injury. 2.
Operation WARNING: Do not allow familiarity with this product to make you careless. Remember that a careless fraction of a second is sufficient to inflict serious injury. gasoline and 2-cycle engine lubricant in a clean container approved for gasoline. DO NOT mix quantities larger than usable in a 30-day period. Recommended fuel: This engine is certified to operate on unleaded gasoline intended for automotive use. Note: We recommend you use high-quality synthetic 2-cycle lubricant in this product.
Ethanol. Gasoline containing up to 10% ethanol by volume (commonly referred to as E10) is acceptable. E15, E20 and E85 are not. Starting the Product See Figures 6 - 7. Starting the product differs depending on whether the engine is cold or warm. Refer to the label on the air filter cover. To Start a Cold Engine: Follow these steps to start a cold engine. Set Choke to RUN Set Choke to FULL 1. Lay the product on a flat, bare surface. Figure 7 2. Push the primer bulb approximately eight times. 3.
Operating the Trimmer PROPER OPERATING POSITION Operating the trimmer differs, depending on whether you are using the curved shaft trimmer or the straight shaft trimmer. WARNING: Engine housing may become hot during trimmer operation. Do not rest or place your arm, hand, or any body part against the engine housing during trimmer operation. Only hold the trimmers as shown in Figure 9 and 10 with all body parts clear of engine housing.
To Advance the Cutting Line 4. Use the tip of string to do the cutting; do not force string head into uncut grass. Line advance is controlled by tapping the string head on grass while running engine at full throttle. 5. Wire and picket fences cause extra string wear, even breakage. Stone and brick walls, curbs and wood may wear string rapidly. See Figure 11. 1. Run engine at full throttle. 2. Tap the knob on ground to advance line. The line advances each time the knob is tapped.
Installing Line in REEL-EASY™ String Head See Figures 14 - 15. Line Use .095 in./2.4 mm diameter monofilament line. 1. Stop the engine and disconnect the spark plug wire. 2. Cut one piece of line approximately 25 ft. (7.6 m) in length. 3. Rotate knob on string head until line on knob aligns with arrows on top of string head. 4. Insert one end of line into eyelet located on either side of the string head and push until line comes out through eyelet on the other side.
Maintenance WARNING: Do not at any time let brake fluids, gasoline, petroleum-based products, penetrating lubricants, etc., come in contact with plastic parts. Chemicals can damage, weaken or destroy plastic which could result in serious personal injury. Cleaning the Product 1. Stop the product before cleaning. 2. Clean the exterior of the product with a damp cloth. 3. Avoid using solvents when cleaning plastic parts.
Replacing the Spark Arrestor See Figure 17. NOTICE: The spark arrestor on this product has not been evaluated by the USDA Forest Service and cannot be used on U.S. forest lands. In addition, product users must comply with Federal, State, and local fire prevention regulations. Check with appropriate authorities. Contact customer service to purchase a replacement spark arrestor. WARNING: Stop engine, remove spark plug boot, and allow engine and muffler to cool before replacing the spark arrestor.
6. Tighten with a socket [torque to 177 in.lb. (20 Nm) minimum, 221 in.lb. (24.97 Nm) maximum. Do not over-tighten]. Idle Speed Screw NOTICE: Be careful not to cross-thread the spark plug. Cross-threading will seriously damage the product. Idle Speed Adjustment See Figure 19. WARNING: The cutting head will move when adjusting the idle speed. Wear all protective clothing and keep all bystanders, children, and pets at least 50 ft. (15 m) away.
Note: Only use the knob to tighten the bolt. The use of other tools may allow overtightening of the bolt, which could damage the string head. Installing REEL-EASY™ String Head See Figures 20 - 21. Stop the engine and disconnect the spark plug wire. Open the Reel Easy string head by depressing the latches on each side. The contents of the string head are spring loaded, so keep your other hand over the string head cover while depressing the latches.
High Altitude Engine Operation Please have an authorized service center adjust this engine if it is to be run above 2000 feet. Failure to do so may result in poor engine performance and increased emissions. An engine adjusted for high altitudes can not be run at 2000 feet or lower. In doing so, the engine will overheat and cause serious engine damage. Please have an authorized service center restore high altitude modified engines to the original factory specification before operating below 2000 feet.
Troubleshooting Problem Engine will not start Engine does not reach full speed and emits excessive smoke Possible Cause 1. No spark Solution 1. Remove the spark plug. Reattach the spark plug cap and lay the spark plug on the metal cylinder. Pull the starter cord and watch for a spark at the spark plug tip. If there is no spark, repeat the test with a new spark plug. 2. No fuel 2. Push primer bulb until the bulb is full of fuel. If the bulb does not fill, the primary fuel delivery system is blocked.
Warranty or accessories which are either incompatible with the Gas Trimmer Product or adversely affect its operation, performance or durability. In addition, this warranty does not cover the following (except to the extent covered by the emissions control warranty set forth below): THIS PRODUCT IS MANUFACTURED UNDER LICENSE FROM THE TORO COMPANY BY TECHTRONIC INDUSTRIES NORTH AMERICA, INC. Techtronic Industries North America, Inc.
Customer Service Information If your product requires service or maintenance, contact your nearest authorized service dealer. To locate your nearest authorized service dealer for this product, contact us toll free at 866-574-9242 (US) or 866-574-9243 (Canada). This product is assembled by Techtronic Industries North America, Inc. under license from the Toro Company Techtronic Industries North America, Inc. P.O.
Forme No. 3378-721 Rev. A Taille-bordures à arbre courbé de 431,8 mm (17 po) Modèles No. 51958—314000001 et suivants Taille-bordures à arbre droit de 457,2 mm (18 po) Modèles No. 51978—314000001 et suivants AVIS Ne pas utiliser d’essence E15, E20 ou E85 (ou un carburant contenant plus de 10 % d’éthanol) dans ce produit. Une telle utilisation représente une violation de la loi fédérale et endommagera l’appareil et annulera la garantie.
Arrêt INFORMATIONS IMPORTANTES Avant d’utiliser ce taille-bordures pour la première fois, lire les conseils utiles ci-dessous. Approvisionnement en carburant AVERTISSEMENT : L’essence et les vapeurs qu’elle dégage sont extrêmement inflammables et explosives. Pour éviter des blessures graves et des dommages matériels, manipuler avec précaution.
Table des matières Introduction....................................................................................................................................................................................4 Règles de sécurité...................................................................................................................................................................... 5-6 Règles de sécurité particulières..............................................................................
Introduction Merci d’avoir acheté un produit Toro. Nous tenons à ce que vous soyez entièrement satisfait de votre nouveau produit. N’hésitez donc pas à contacter un concessionnaire réparateur agréé pour tout ce qui concerne l’entretien et le dépannage, la commande de pièces détachées ou tout renseignement qui pourrait vous être utile. Lors de tout contact avec un concessionnaire agréé, veiller à disposer des numéros de modèle et de série du produit.
Règles de sécurité AVERTISSEMENT : Lire et veiller à bien comprendre toutes les instructions. Le non respect des instructions ci-dessous peut entraîner un choc électrique, un incendie et / ou des blessures graves. Lire toutes les instructions Pour travailler en toute sécurité, lire et veiller à bien comprendre toutes les instructions avant d’utiliser ce produit. Respecter toutes les instructions de sécurité. Le non respect des instructions de sécurité ci-dessous peut entraîner des blessures graves.
a) Garder le corps au chaud par temps froid. Pendant l’utilisation, porter des gants afin de tenir les mains et les poignets au chaud. Il a été établi que le froid est l’une des principales causes du symptôme de Raynaud. Mélanger le carburant à l’extérieur, loin de toute flamme ou source d’étincelles. Essuyer tout carburant répandu. S’éloigner de 9 m (30 pi) du point d’approvisionnement avant de lancer le moteur. Desserrer le bouchon du réservoir de carburant lentement une fois que le moteur est arrêté.
Symboles Les termes de mise en garde suivants et leur signification ont pour but d’expliquer le degré de risques associé à l’utilisation de ce produit. SYMBOLE SIGNAL SIGNIFICATION DANGER : Indique une situation extrêmement dangereuse qui, si elle n’est pas évitée, aura pour conséquences des blessures graves ou mortelles. AVERTISSEMENT : Indique une situation potentiellement dangereuse qui, si elle n’est pas évitée, aura pour conséquences des blessures graves ou mortelles.
Autocollants Les autocollants d’instructions et de mises en garde sont placés bien en vue de l’opérateur, près des pièces présentant un danger potentiel. Remplacer immédiatement tout autocollant manquant ou endommagé. Réf. 940686148 Réf. 940864003 MARCHE ARRÊT Réf. 940657034 Réf. 940657032 50' 15m Handle Position Réf.
Caractéristiques Fiche technique Nom Caractéristique Moteur 25,4 cc, vilebrequin complet Largeur de coupe No. de modèle 51958 43,2 cm (17 po) No. de modèle 51978 45,7 cm (18 po) Diamètre de ligne 2,4 mm (0,095 po) Poids No. de modèle 51958 5,3 kg (11.6 lb) No. de modèle 51978 5,6 kg (12.
Apprendre à produit Protecteur à gazon Le protecteur à gazon empêche l'herbe de s'enrouler autour du manche du taille-bordures Voir la figure 1. L’utilisation sûre de ce produit exige une comprehension des renseignements figurant sur l’outil et contenus dans le manuel d’utilisation, ainsi qu’une bonne connaissance du projet entrepris. Avant d’utiliser ce produit, se familiariser dans le présent manuel et dans les manuels d’utilisation de tous les accessoires employés avec ce bloc moteur.
Assemblage Déballage Ce produit doit être assemblé. n Avec précaution, sortir le produit et les accessoires de la boîte. S’assurer que toutes les pièces figurant sur la liste de contrôle sont incluses. AVERTISSEMENT : Ne pas utiliser le produit si, en le déballant, vous constatez que des éléments figurant dans la liste des pièces sont déjà assemblés. Certaines pièces figurant sur cette liste n’ont pas été assemblées par le fabricant et exigent une installation.
1. Arrêter le moteur et débrancher le fil de la bougie. 2. Desserrer le bouton en le tournant vers la gauche. 3. Retirer le capuchon de l’arbre d’accessoire. 4. Appuyer sur le bouton se trouvant sur l’arbre de l’accessoire. Aligner le bouton sur la rainure guide du bloc-moteur et emboîter les deux arbres. Tourner l’arbre de l’accessoire jusqu’à ce que le bouton s’enclenche dans le trou de positionnement.
Installation du déflecteur d’herbe d’arbre courbe Installation du déflecteur d’herbe d’arbre droit Pour installer le déflecteur d’herbe d’arbre courbe, procéder comme suit. Pour installer le déflecteur d’herbe d’arbre droit, procéder comme suit : 1. Arrêter le moteur et débrancher le fil de la bougie. 1. Arrêter le moteur et débrancher le fil de la bougie. 2. Retirer le boulon à six pans et l’écrou papillon du déflecteur d’herbe. 2. Retirer la boulon fendue du déflecteur d’herbe. No.
Utilisation AVERTISSEMENT : Ne pas laisser la familiarité avec l’outil faire oublier la prudence. Ne pas oublier qu’une fraction de seconde d’inattention peut entraîner des blessures graves. AVERTISSEMENT : Porter une protection oculaire munie d’écrans latéraux certifiée conforme à la norme ANSI Z87.1 ainsi qu’une protection auditive. Ne pas suivre cette directive pourrait entraîner des blessures graves, par exemple si l’appareil projetait des objets dans vos yeux.
Carburants oxygénés AVIS : Ne pas utiliser d’essence E15, E20 ou E85 (ou un carburant contenant plus de 10 % d’éthanol) dans ce produit. Une telle utilisation représente une violation de la loi fédérale et endommagera l’appareil et annulera la garantie. Les dommages au circuit de carburant et les problèmes de performance résultant de l’utilisation de carburant oxygéné contenant des pourcentages de composants oxygénés supérieurs à ceux indiqués ci-dessous ne sont pas couverts par la garantie. Éthanol.
Utilisation du taille-bordures BONNE POSITION DE TRAVAIL L’utilisation d’un taille-bordures n’est pas la même selon qu’il est équipé d’un arbre droit ou d’un arbre courbe. ADVERTENCIA: Le logement du moteur peut devenir chaud pendant l’utilisation du taille bordures à fil. Éviter de placer ou d’appuyer le bras, la main ou toute autre partie du corps contre le logement du moteur pendant l’utilisation du taille bordures.
Avance de la ligne de coupe 4. Couper avec l’extrémité de la ligne ; ne pas forcer la tête de coupe dans l’herbe non coupée. L’avance de la ligne est obtenue en tapant la tête de coupe sur le gazon, le moteur tournant à plein régime. 5. Les palissades en métal et en bois accélèrent l’usure de la ligne et peuvent la faire casser. Les murs en pierre et brique, trottoirs et pièces de bois peuvent user la ligne rapidement. Voir la figure 11. 1. Faire tourner le moteur à plein régime. 2.
Installation du fil dans la tête de coupe REEL-EASY™ Voir les figures 14 et 15. Ligne Utiliser un fil monofilament dont le diamètre mesure 2,4 mm (0,095 po). 1. Arrêter le moteur et débrancher le fil de la bougie. 2. Couper un segment de fil d’une longueur d’environ 7,6 m (25 pi). 3. Tourner le bouton sur la tête de coupe jusqu’à ce que la ligne inscrite sur le bouton soit vis à vis les flèches situées sur le dessus de la tête de coupe. 4.
Entretien AVERTISSEMENT : Ne jamais laisser de liquides tels que le fluide de freins, l’essence, les produits à base de pétrole, les lubrifiants pénétrantes, etc., entrer en contact avec les pièces en plastique. Les produits chimiques peuvent endommager, affaiblir ou détruire le plastique, ce qui pourrait entraîner des blessures graves. Nettoyage 1. Arrêter le moteur avant de nettoyer l’outil. 2. Nettoyer l’extérieur de l’outil avec un chiffon humide. 3.
AVERTISSEMENT : Arrêter le moteur, retirer la coiffe de bougie et laisser refroidir le moteur et le pot d'échappement avant de remplacer le pare-étincelles. Tout contact avec un pot d'échappement ou un moteur chaud peut occasionner des brûlures ou des blessures graves. Note : Suivant le type de carburant utilisé, le type et la quantité de lubrifiant et / ou les conditions de travail, l’orifice d’échappement et le silencieux peuvent se calaminer.
Réglage du ralenti Remisage Voir la figure 19. AVERTISSEMENT : L'accessoire de coupe tournera lors du réglage du ralenti. Porter tous les vêtements de protection et garder les badauds, enfants et animaux à une distance de 15 m (50 pi). Faire les réglages en supportant l'outil avec les mains de manière à ce que l'accessoire de coupe/lame ne touche pas le sol ou tout autre objet. Garder toutes les parties du corps éloignées de l'accessoire de coupe et du silencieux.
Installation de la tête de coupe REELEASY™ Voir les figures 20 et 21. Arrêter le moteur et débrancher le fil de la bougie. Ouvrir la tête de coupe Reel-Easy en appuyant sur les loquets situés de chaque côté. La tête de coupe renferme un ressort contracté. Par conséquent, il importe de placer l’autre main sur le dessus du couvercle de la tête de coupe au moment d’appuyer sur les loquets. Retirer le couvercle, le bouton et la bobine de la tête de oupe et mettez-les de côté.
Fonctionnement du moteur à haute altitude Confier le moteur à un centre de réparations agréé si celui-ci doit être utilisé à une altitude supérieure à 609,6 m (2 000 pi). Ne pas suivre cette directive peut nuire au bon fonctionnement du moteur et augmenter les émissions. Un moteur qui a été réglé pour fonctionner à haute altitude ne peut être utilisé à 609,9 m (2 000 pi) ou moins. Ne pas respecter cette directive peut entraîner une surchauffe du moteur et l’endommager sérieusement.
Dépannage Problème Cause possible Solution Le moteur ne démarre pas 1. Pas d’étincelle 1. 2. Pas de carburant 2. 3. Moteur noyé 3. 4. Le cordon du lanceur est plus difficile à tirer que lorsque l’outil était neuf 4. 1. Vérifier le mélange de carburant 1. 2. 3. Filtre à air encrassé Écran pare-étincelles encrassé 2. 3. 1. 2. 3. Ligne soudée sur elle-même Pas assez de ligne sur la bobine Ligne trop courte 1. 2. 3. 4. Ligne emmêlée sur la bobine 4. 5. Régime moteur trop lent 5.
Garantie CE PRODUIT EST FABRIQUÉ PAR TECHTRONIC INDUSTRIES NORTH AMERICA, INC., SOUS LICENCE DE THE TORO COMPANY. Techtronic Industries North America, Inc.
Service après-vente Pour tout entretien ou réparation du produit, contacter le centre de réparations agréé le plus proche. Pour obtenir l’adresse du centre de réparations agréé le plus proche, appeler gratuitement le 866-574-9242 (États-Unis) ou le 866-574-9243 (Canada). Ce produit est fabriqué par Techtronic Industries North America, Inc., sous licence de The Toro Company. Techtronic Industries North America, Inc. P.O.
Forma No. 3378-721 Rev. A Recortadora de hilo de eje curvo de 431,80 mm (17 pulg.) Modelo 51958—314000001 en Adelante Recortadora de hilo de eje recto de 457,20 mm (18 pulg.) Modelo 51978—314000001 en Adelante AVISO No utilice combustibles E15, E20 o E85 (ni combustibles que contengan más de 10 % de etanol) con este producto. Esto constituye una violación a la ley federal, dañará la unidad y anulará la garantía.
LEA ESTA INFORMACIÓN Antes de utilizar su nueva recortadora, lea las siguientes útiles sugerencias iniciales. Abastecimiento de combustible ADVERTENCIA: La gasolina y sus vapores son extremadamente inflamables y explosivos. Para evitar graves lesiones personales y daños materiales, manipule con cuidado. Mantenga alejado de fuentes de ignición y llamas expuestas, manipule solamente en lugares abiertos, no fume y limpie todo derrame inmediatamente. 1. Obtenga un recipiente limpio aprobado para gasolina. 2.
Índice de contenido Introducción...................................................................................................................................................................................4 Reglas de seguridad................................................................................................................................................................... 5-6 Reglas de seguridad especificas.................................................................................
Introducción Le agradecemos la compra de un producto Toro. Nos gustaría lograr su completa satisfacción con su nuevo producto, por lo cual le suplicamos ponerse en contacto con un establecimiento de servicio autorizado si necesita servicio, piezas Toro genuinas o cualquier información. Siempre que se comunique con un establecimiento de servicio autorizado, tenga a la mano el número de modelo y el de serie del producto.
Reglas de seguridad generales ADVERTENCIA: Lea y comprenda todas las instrucciones. El incumplimiento de las instrucciones señaladas abajo puede causar descargas eléctricas, incendios y lesiones corporales serias. Lea todas las instrucciones Para utilizar este producto de una forma segura, lea y entienda todas las instrucciones antes de usarlo. Siga todas las instrucciones de seguridad. La inobservancia de todas las instrucciones de seguridad señaladas abajo puede causar lesiones corporales graves.
b) Después de cada período de utilización de la unidad, haga ejercicio para aumentar la circulación de la sangre. c) Tome descansos frecuentes durante el trabajo. Limite la cantidad de exposición al día. d) Mantenga la herramienta bien cuidada, con los elementos de sujeción debidamente apretados y siempre cambiando las piezas desgastadas. Si sufre cualquiera de los síntomas propios de esta condición, de inmediato interrumpa el uso de la unidad y consulte a su doctor en lo concerniente a los mismos.
Símbolos Las siguientes palabras de señalización y sus significados tienen el objeto de explicar los niveles de riesgo relacionados con este producto. Símbolo Señal Significado PELIGRO: Indica una situación peligrosa inminente, la cual, si no se evita, causará la muerte o lesiones serias. ADVERTENCIA: Indica una situación peligrosa posible, la cual, si no se evita, podría causar la muerte o lesiones serias.
Etiquetas del producto Las etiquetas e instrucciones del producto son fácilmente visibles al operador, y están situadas cerca de cualquier área de posible peligro. Reemplace toda etiqueta dañada o faltante. Núm. pieza 940686148 Núm. pieza 940864003 ENC. APAG. Núm. pieza 940657032 Núm. pieza 940657034 50' 15m Handle Position Núm.
Características Especificaciones Nombre Especificación Motor 25,4 cc, de biela grande Ancho de corte Modelo 51958 43,2 cm (17 pulg.) Modelo 51978 45,7 cm (18 pulg.) Diámetro del hilo 2,4 mm (0,095 pulg.) Peso Modelo 51958 5,3 kg (11,6 lb.) Modelo 51978 5,6 kg (12,5 lb.
Familiarícese con su producto Protector de la fresa Vea la figura 1. El protector de la fresa evita que el césped se envuelva alrededor del eje de la podadora. Para usar este producto con la debida seguridad se debe comprender la información indicada en la herramienta misma y en este manual, y se debe comprender también el trabajo que intenta realizar.
Armado Desempaquetado Este producto requiere armarse. n Extraiga cuidadosamente de la caja la producto y los accesorios. Asegúrese de que estén presentes todos los artículos enumerados en la lista de empaquetado. ADVERTENCIA: No utilice este producto si alguna pieza incluida en la lista de empaquetado ya está ensamblada al producto cuando lo desempaqueta. El fabricante no ensambla las piezas de esta lista en el producto. Éstas deben ser instaladas por el usuario.
Conexión del accesorio al eje superior Desmontaje del accesorio del eje superior Vea la figura 2. Vea la figura 2. ADVERTENCIA: Nunca una ni ajuste ningún aditamento, desmontar o mientras esté funcionando el cabezal motor. Si no apaga el motor puede causarse lesiones serias a sí mismo y a otras personas. Nunca opere cabeza motor sin ningún archivo aditamento. Nunca opere el cabezal motor sin un accesorio.
Montaje del deflector de pasto El montaje del deflector de pasto difiere según sea el tipo de recortadora: de eje curvo o de eje recto. ADVERTENCIA: La hoja de corte en línea del deflector de césped es filosa. Evite el contacto. De no hacerlo, se pueden provocar lesiones personales de gravedad. ADVERTENCIA: Siempre adjunte el deflector de césped antes de accionar la recortadora. De no hacerlo, cualquier residuo que hubiera puede volar en dirección al operador y ocasionar lesiones de gravedad.
Funcionamiento ADVERTENCIA: No permita que su familarización con este producto le vuelva descuidado. Tenga presente que un descuido de un instante es suficiente para infligir una lesión grave. ADVERTENCIA: Use siempre protección ocular con protección lateral con la marca de cumplimiento de la norma ANSI Z87.1 junto con protección auditiva. La inobservancia de esta advertencia puede causar el lanzamiento de objetos hacia los ojos y otras lesiones graves.
Combustibles oxigenados AVISO: No utilice combustibles E15, E20 o E85 (ni combustibles que contengan más de 10 % de etanol) con este producto. Esto constituye una violación a la ley federal, dañará la unidad y anulará la garantía. No están cubiertos en la garantía los problemas de desempeño o daños al sistema de combustible producidos por el uso de un combustible oxigenado con un contenido superior a los porcentajes de alcohol o compuesto de éter señalados abajo. Etanol.
Utilización de la recortadora La utilización de la recortadora es diferente, según esté usándose la de eje curvo o la de eje recto. POSICIÓN CORRECTA PARA EL MANEJO DE LA HERRAMIENTA ADVERTENCIA: Es posible que la carcasa del motor se caliente mientras la recortadora de hilo esté en uso. No apoye ni coloque el brazo, la mano ni ninguna parte del cuerpo contra la carcasa del motor mientras la recortadora esté en uso.
Para avanzar el hilo de corte 4. Use la punta del hilo para efectuar el recorte; no fuerce el cabezal del hilo hacia la hierba sin cortar. El avance del hilo se controla golpeando levemente el cabezal del hilo contra el pasto mientras el motor funciona a la máxima aceleración. 5. Las cercas de alambre y de estacas causan desgaste adicional en el hilo, incluso la ruptura del mismo. Los muros de piedra y de ladrillo, los cordones y la madera pueden gastar rápidamente el hilo. Vea la figura 11. 1.
Instalación del hilo en el cabezal del hilo REEL-EASY™ Vea las figuras 14 y 15. Línea Use un hilo monofilar de 2,4 mm (0,095 pulg.) de diámetro. 1. Apague el motor y desconecte el cable de la bujía. 2. Corte una pieza de hilo de aproximadamente 7,6 m (25 pies) de largo. 3. Gire la perilla en el cabezal del hilo hasta que la línea de la perilla quede alineada con las flechas en la parte superior del cabezal del hilo. 4.
Mantenimiento ADVERTENCIA: No permita en ningún momento que fluidos para frenos, gasolina, productos a base de petróleo, lubricantes penetrantes, etc., lleguen a tocar las piezas de plástico. Los productos químicos pueden dañar, debilitar o destruir el plástico, lo cual podría causar lesiones serias. Limpieza de la producto 1. Apague la herramienta antes limpiarla. 2. Limpie la parte exterior de la herramienta con un paño húmedo. 3. Evite el empleo de solventes al limpiar piezas de plástico.
Reemplazo del parachispas Vea la figura 17. AVISO: El parachispas que acompaña a este producto no ha sido evaluado por el Servicio Forestal del Departamento de Agricultura de EE. UU. y no se puede usar en terrenos forestales de EE. UU. Además, los usuarios del producto deben cumplir con los reglamentos de prevención de incendios locales, estatales y federales. Consulte a las autoridades que correspondan. Póngase en contacto con el servicio al cliente para comprar un parachispas de repuesto.
4. Inspeccione nueva bujía. La bujía debe tener el debido espacio interelectródico y debe estar libre de depósitos para que el motor funcione de forma correcta. La separación correcta aproximada es 0,64 mm (0,025 pulg.). Para ampliar la separación, doble con cuidado el electrodo (superior) de conexión a tierra. Para angostar el espacio, golpee suavemente sobre una superficie dura el electrodo de tierra. 5. Enrosque la nueva bujía con la mano, girándola hacia la derecha. 6.
Instalación del cabezal del hilo REEL-EASY™ Vea las figuras 20 y 21. Apague el motor y desconecte el cable de la bujía. Abra el cabezal del hilo REEL-EASY oprimiendo los pestillos a cada lado. Dado que el contenido del cabezal del hilo tiene resorte, mantenga la otra mano sobre la tapa del cabezal del hilo mientras oprime los pestillos. Retire la tapa, la perilla y el carrete del cabezal del hilo, y deposítelos a un lado. Coloque el alojamiento superior sobre el eje impulsor.
Operación del motor a altitudes elevadas Lleve este equipo a un centro de servicio técnico autorizado para que ajusten este motor en caso de que se lo deba hacer funcionar a más de 609,6 metros (2000 pies) de altura. De no hacerlo, el rendimiento del motor podría ser deficiente y se generaría un mayor nivel de emisiones contaminantes. Un motor ajustado para altitudes elevadas no puede hacerse funcionar a una altura inferior a los 609,6 metros (2000 pies).
Corrección de problemas Problema Causa posible Solución El motor no arranca 1. No produce chispa la bujía 1. Retire la bujía. Vuelva a colocar la tapa de la bujía y deposite ésta sobre el cilindro metálico. Tire de la cuerda del arrancador y observe el extremo de la bujía para ver si hay chispa. Si no hay chispa, repita la prueba con una bujía nueva. 2. No hay combustible 2. Oprima la bomba de cebado hasta que se llene de combustible.
Garantíe ESTE PRODUCTO HA SIDO FABRICADO POR TECHTRONIC INDUSTRIES NORTH AMERICA, INC. CON AUTORIZACIÓN DE THE TORO COMPANY. Techtronic Industries North America, Inc.
Notes
Notes
Información sobre servicio al consumidor Si el producto requiere servicio o mantenimiento, comuníquese con el establecimiento de servicio autorizado más cercano. Para encontrar el establecimiento de servicio autorizado más cercano a used, le suplicamos llamarnos a la línea gratuitas, al 866-574-9242 (en EE.UU.) o al 866-574-9243 (en Canadá). Este producto ha sido fabricado por Techtronic Industries North America, Inc. con autorización de The Toro Company. Techtronic Industries North America, Inc. P.O.