
Installation Instructions

1. Remove the top by pulling up on one edge.
2. Pull the burned out lamp straight out of the socket.
Replace the new lamp by pushing a standard 12-watt
No. 912 lamp (Toro model 52977) or the optional 18-
watt No. 921 lamp (Toro Model 52976).
3. Replace the top onto the fixture by pressing it firmly in
place and rotating it until the snaps align.
INSTALLATION GUIDE
FORM NO. 3315–924
MODEL NO. 52206 39000001 & up
Garden Lights
®
One
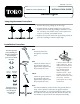
Thread the lead wire
through the extension
tube.
Two
Attach the fixture head to
the extension tube and
tighten them together with
the provided set screw.
Three
Attach the ground stake to
the extension tube and
tighten them together with
the provided set screw.
Five
Connect cables with the
cable connector. Place
cable from the fixture in
the groove marked “18
GA.” and the power
cable in the groove
marked “16 GA.” Now
put the cover over the
cables and fasten it with
the screw. Turn the
power pack on to verify
connection.
Four
For stake installation, make a hole in the ground about 8"
deep. Do not push the stake into the ground without
making a hold first, or you may damage the stake. Insert
the stake into the hole and push dirt around the stake. Do
not hammer or press hard on the lamp-head assembly.
Lamp Replacement Procedure
Installation Procedure
The most important
part of installing the
fixtures is making sure
their metal pins
pierce the wire inside
the cable:
You’ll know they’re
well-aligned and the
wire was pierced
when the light
comes on.
Misaligned
Piercing
Points
Correct
Piercing
Points
This
Not This