
Operator's Manual


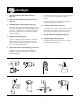

7
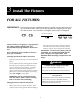
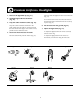
1. Press the bulb into the fixture contacts
(Fig. 19).
2. Snap the silver reflector into the clear lens
(Fig. 19).
3. Install the fixture lens/reflector (Fig. 20).
Install the clear lens/reflector by pushing down on
the lens with slight pressure while turning the lens
clockwise. The tabs on the lens will snap into the
three slots on the fixture. Turn the lens until the
movement stops.
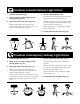
4. Prepare the stake (Fig 21).
Loop the cable around the channels in the stake.
Make certain the cable is centered around the
stake head and is tight. If the cable is loose, pull
the ends to eliminate the slack.
5. Attach the fixture to the stake (Fig. 22 & 23).
Align the side of the stake with the imprinted
triangle to the top of the fixture head with the
imprinted triangle.
Hold the stake with the cable at an angle of about
30° (1 o'clock) to the floodlight housing as
shown.
Press the stake with the cable down firmly into
the piercing points on the fixture.
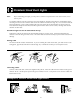
6. Lock the stake in place (Fig. 24).
After the fixture has lit, turn the stake away from
the imprinted triangle on the fixture to lock it in
place. Pull on the cable to remove any slack.
7. Put the stake into the ground (Fig. 25).
8. Adjust the light beam (Fig. 26).
To adjust the light beam from narrow to broad,
turn the lens using the tabs.
Floodlights
Fig. 19 Fig. 20 Fig. 21 Fig. 22
Imprinted
triangles
1
o'clock
Imprinted
triangles on
the stake
and the
fixture
Fig. 23 Fig. 24 Fig. 25 Fig. 26