
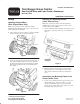
Installation Instructions

3
Figure 9
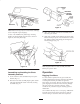
Note: Plastic lawn bags may be inserted inside cloth bags
to aid in disposal of grass clippings.
To ease in the installation of plastic bags, insert bag
handles into frame brackets from the rear as shown in
Figure 10, and insert plastic bags.
Figure 10
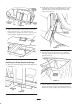
Assembling and Installing the Chute
Assembly and Duct
1. Secure retainer to duct with barbed clip and spacer
fastener (Fig. 11).
2. Slide duct onto chute assembly, aligning duct retainer
with chute knob. Hook retainer onto knob, securing
assemblies (Fig. 11).
Figure 11
3. After chute assembly and duct are assembled, slide
duct onto grass catcher.
4. Slide chute assembly under deflector. Hook rear chute
bracket around pivot post on deck. Slide front of chute
into locking position with mating part of hinge lock.
Insert locking pin (Fig. 12).
Figure 12
Note: Support bracket on chute assembly must hook
behind pivot post on deck.
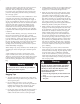
Operation
Bagging Conditions
To ensure efficient operation of the grass catcher, the
operating characteristics must be understood. In addition
to cutting turf uniformly, the blade also generates
high-velocity air currents. These air currents help propel
grass clippings from under the mower housing, through
the duct, and into the grass bags. However, certain
conditions may cause the rear grass catching system to
malfunction.
One condition that may cause a “conveying” malfunction
from the mower housing to the grass bags is when the
mower housing is set too low. Since air is required to